The summer seems to have flown by. It is hard to believe that the regular baseball season is over, school has been in session for a month, that there is not much left in the vegetable garden, that our shop hop starts in less than a month, that Fall Quilt Market is in three weeks and that I leave in two days for two weeks in Nepal…Yikes!
Ok, I’ll take a big breath and give a few words of wisdom before I sign off and start packing. I have talked all summer about our annual shop hop, Quilters’ Quest, and I have shared with you the progress as I have worked on the quilt for our shop this year.
When I finished the top a month ago I really wanted it quilted. Since I pieced it all by hand (while watching baseball games all summer) I wanted it quilted by hand as well. I am amazed at how fast the quilting is going. So far I have only been quilting on it for three and a half weeks but I already have two thirds of it completed. But I guess if you are a little diligent and do some each day it gets done! I work on it an hour in the morning when I first get up, an hour during the evening news and three or more hours during the baseball game. Since I have a lot of travel this month, I won’t get it completely finished before the shop hop but I’ll come close.
I want to share with you two of my favorite tools when quilting by hand. The first is TJ’s Quick Quilter Spoon. I have been using this for years. It helps me get even stitches and protects my fingers. The second tool is some long-nosed pliers. While quilting, I usually get five or six stitches on my needle at a time. I’m getting a little arthritis in my fingers and sometimes it is hard to pull the needle through. A pair of needle nosed pliers does the trick! I just keep it near me on the top of the quilt and use it to pull out the needle. It saves the fingers and makes the quilting go quicker since I can stack more stitches on the needle each time.
We just had our latest shop hop meeting a few days ago. All of the shop owners shared their quilts. What a spectacular array! When you participate in the Quest, you can pick up a free pattern at each shop for their quilt. That’s a total of 10 FREE patterns! I am at the Studio every day of the Quest to greet you and hand out our patterns. I hope to see you then!
This year Quilters’ Quest will take place November 4th through November 13th.
Participating stores will be open Monday-Saturday 9:30am-6:00pm and Sunday 11:00am-4:00pm. Visit www.quiltersquest.org for details.
Jinny is off this week so the staff here at the Studio decided to take over her blog. The takeover was prompted by a discussion of this week’s web special. In the web special, we are offering a bundle of autumn colored fabrics inspired by a photograph of the spectacular colors of the maple tree at the Studio’s front door. How did we get from that photograph to the fabrics for this week’s special?
Looking at the image, you will see in the lower left corner the colors taken from the photograph. Jinny explained in her blog in April 2014 how you can do this with any photograph using Photoshop software. From that, she chose eight fabrics ranging from warm golds, oranges and reds to a weathered dark brown. Compare the fabrics with the color palette from Photoshop. Don’t they look wonderful?
But where there are pretty shaded fabrics, there is always the question of where to use them.
Jinny next went into the Quilter’s Design Board on our website. The Design Board allows you to download hundreds of free quilt blocks, get fabric recommendations, yardage requirements and more. After looking through it, she chose two blocks to play around with. Here is what she started with to get to the two quilts above.
Choose the size you want your blocks to be and you can see the templates for each patch and how many you will need along with a handy template guide for how to put your block together.
You can print the templates directly onto template film. Check out this tutorial on our website.
All that’s left is to pull out your fabric and get started. You can make the scrappy Bear’s Foot or the shaded Pine Tree. You just need a half yard bundle and two yards each of a background and border print. We can’t wait to see what you come up with.
Each year 10 shops from Virginia and Maryland join together during a ten day period in early November for our annual Quilters’ Quest shop hop. We plan a color scheme and each shop makes a quilt with those colors. As participants in the Quest go to each shop they can pick up a free pattern for that shop’s quilt.
Exactly two months ago I began hand-stitching Labyrinth, our Jinny Beyer Studio quilt for this year’s shop hop. I did all the sewing while watching the Washington Nationals baseball games on TV.
Along the way I have shown you bits and pieces of the quilt blocks. Now that the top is finished I want to share it with you. This year I chose a pattern that wasn’t as difficult as the ones from the past two years. Labyrinth has only straight-line sewing and no set-in seams. Even though I pieced it by hand, it is very easy to machine piece as well.
Here is a chart of the colors all the shops are working with. For Labyrinth I decided to leave out the oranges and teals and just use the blues, reds, purples and magentas.
We are also making a second quilt with only 16 blocks instead of 36. In this quilt we have left out the blues and teals and added the oranges. When it is finished we will show you the comparison. It will be fun for all of us to see the difference that one change of color will make.
It is not too late to make plans to join us for the Quest. All of the shops are planning two-day excursions by bus. Most shops still have openings. We get a lot of people from out of the area participating and hope you will too!
I was sewing the border on the quilt for this year’s Quilters’ Quest the other night while watching the Washington Nationals vs. Baltimore Orioles baseball game on television and I found myself paying more attention to the brick wall behind the batter than the player himself.
It took me back to the last Jinny Beyer Club meeting at the shop. One of the women stood up and was showing a quilt that she had hand pieced. It was beautifully done, but she was a bit apologetic, saying that she knew everything was not perfectly straight. I then had to give her my abbreviated speech on symmetry.
Pick up a leaf and look at it. At first glance, the right and left halves appear to be symmetrical but on closer observation you can see little discrepancies. It is those differences that make the leaf more interesting to look at than if was perfectly symmetrical.
Even though the human face looks the same on both sides, once again there are differences that make the face more interesting than if it was perfectly symmetrical. Look at this photo of Abraham Lincoln and the difference in how the face looks when you make the two halves exactly mirror each other. The face has now lost its character.
To me it is the same thing in quilting. Quilts that are made with strips cut and pieced together and then cut up again into blocks or triangles and made into a quilt can be lovely but there is a certain charm in a quilt made with scraps or multiple fabrics where all the blocks are not exactly the same.
The same can be true of the quilting process. Computer-guided longarms have made it much easier to finish a quilt with perfectly completed quilting designs and opened the door to many who do not have the time in their lives to finish certain projects. But if you don’t try the quilting yourself because you feel you can’t be perfect, you may be missing the joy and pride of making the quilt entirely yours.
As I studied that brick wall behind the batter, I loved the fact that bricks were not evenly spaced and perfectly symmetrical. It gave the wall character and charm, making it much more interesting that a pre-fab brick wall. The same should be true of your quilting projects. Celebrate the little idiosyncrasies, and know that is what makes your quilt unique.
From the time I first began quilting I experimented with ways to “fussy cut” fabrics to give interest to the blocks I was making. Unbeknownst to me during that same time, an Englishwoman named Lucy Boston (1892-1990) was doing her own experimenting with fabrics and she created many spectacular quilts, probably the most famous being her Patchwork of the Crosses.
With the renewed interest in hand piecing and working with mirror-imaged fabrics, Lucy’s Patchwork of the Crosses block has become very popular. The block is made with with a single shape–the honeycomb (elongated hexagon). The blocks are then joined with squares.
Some people stitch the blocks in the traditional manner and some use the English paper piecing technique. No matter which technique you use, the most fun part is seeing how many different ways you can cut the fabric to create different effects.
I experimented with the Patchwork of the Crosses block using just two border print fabrics. Typically a mirror-imaged motif is centered in the middle of the template, such as you see here.
But what happens if you deliberately “skew” the template so that the mirror-imaged motif is not centered?
Mark a portion of the design onto the template and then flip it and find the mirror-imaged counterpart.
That technique was used in the corners of the two blocks shown above.
As we began playing around with Lucy Boston blocks and hexagons, or “hexies,” last year, we began to carry acrylic and paper templates for these projects making the process faster and easier. We also have some tips on our website for fussy cutting border prints for these projects. We’ve been having so much fun with these. Why don’t you give it a try?
I just couldn’t resist the Zipster pouches that are in our web special this week. In case you didn’t notice, they shade from top to bottom. And as you may have heard, I have this thing for shading. As soon as I saw them I just had to make some shaded bundles to go with them.
People have asked what the secret is for shading colors. It is not difficult. You can shade light to dark within a color and then link it to another color through very dark or black. You can shade through medium values into another color, or you can shade lighter and go through lights.
When I go on a tour with people I can’t help myself sometimes when we do a group photo. People are never asked to wear anything special, but for the photo I like to shade everyone together according to what they have on that day.
This is a photo that was taken in front of Amber Palace in India on a trip with Sew Many Places. It is a perfect example of my shading addiction. Notice the five women in the lower right. Within just those five, the colors go from light to dark and from bright orange to deep burgundy. The woman in the center is what I call the “transition” color because her shirt is a mixture of slightly orange and slightly pink…sort of watermelon.
The man in the second row down with the turban is the transition between the gold and the coral shirts. The four of us in the lower left probably should have been reversed so that the lime green shirt was next to the greenish gold shirt. But how much rearranging could I expect my fellow travelers to put up with?
Fortunately, this shading addiction led to my creating the 150 shaded fabrics in my Palette Collection along with the Portable Palette.
I will be taking another trip with Sew Many Places this October to Nepal. There are still a few spaces left. It is a colorful country and I’m looking forward to going once again. It’s not too late for you to sign up and join me for this fabulous tour.
It is hard to believe it is almost the middle of August. I stay close to home this time of year to tend the garden, harvest the produce and catch up on projects.
Always during this time I am designing and making our quilt for the annual shop hop in our area, “Quilter’s Quest”. Each of the 10 shops designs a quilt based on fabric swatches that are collected during the Quest. Participants can pick up the free patterns at each of the stores.
2016 Quilters’ Quest Colors
I’m piecing our quilt by hand, although it is very conducive to machine piecing as all of the seams are straight lines with no set-in parts. I get most of my work done while watching the Washington Nationals baseball games. I finally finished all the blocks and am giving you a sneak preview here. I’ll have the top finished soon.
We had our shop hop meeting at the Studio this week and we are gearing up for this special event. In case you want to leave the driving to us, all shops still have space available on their buses including two buses from the Studio.
The Quest newsletter goes out the middle of each month from now through November. Be sure to sign up for it for the latest information and to get the free patterns for our Quest Mystery Quilt. Here are the first two blocks.
The patterns are only available through the newsletter. Shops have fabric kits for the fabrics they are using in their version of the mystery quilt. You can sign up for the Quest newsletter here.
The vegetable garden is consuming quite a bit of my time. I have never had so many cucumbers. I am constantly begging people to take some. I take them to the shop and when a customer comes in I tell them “Congratulations! You have just won a door prize.” I was not able to get to the garden last Friday and, by skipping just that one day, some of the cucumbers and zucchini got out of hand. I loaded up bags and took them as well as tomatoes and basil to the shop.
My favorite cucumber is a Japanese variety called Palace King. No matter how large they get, they still stay crispy and taste fantastic. The one in the photo is by far the biggest I have had. It measured 23”! The zucchini is 22”.
So, what do you do with all of that zucchini? One of my employees took one home and made delicious zucchini bread. I asked for the recipe. I hardly ever do a recipe exactly how it is given so I altered it a bit. I am on a self-imposed low cholesterol diet. I would rather regulate my cholesterol with diet instead of pills. So for this recipe I used 6 egg whites instead of 3 whole eggs. I used a half cup less sugar (and substituted brown sugar for the white). I thought cranberries would be a nice addition. I always like to sprinkle lemon/sugar zest on the top of the batter before baking so I included that as well. I served this at the Quest meeting the other day and everyone wanted the recipe, so I am giving it here for you as well.
Happy summer!
Jinny
No Cholesterol, Low Fat Zucchini Bread
Makes 2 loaves
Ingredients
Butter and flour for preparing baking pans
3 cups unbleached flour
1 teaspoon salt
1 teaspoon baking soda
1 teaspoon baking powder
4 teaspoons ground cinnamon
1 teaspoon nutmeg
3½ cups grated zucchini (you can use as little as 2 cups and as much as 4)
6 egg whites (After doing a price comparison on eggs vs. egg whites in a carton, I found that for $2.99 I could get a dozen eggs. For the same amount of egg whites I could get from that dozen it was more than twice the price. So I’d rather discard the yolks or save and microwave them to add to the dog food.)
½ cup applesauce
½ cup vegetable oil
1 ¾ cup brown sugar
4 teaspoons vanilla extract
1 ½ cups coarsely chopped pecans
1 ½ cups dried cranberries
3 Tablespoons Smart Balance (similar to margarine)
3 Tablespoons sugar
grated rind of 1 large lemon
Preheat oven to 350 degrees F. Generously butter and lightly flour two 8”x4” loaf pans.
1. In a medium bowl, sift together flour, salt, baking soda, baking powder, cinnamon and nutmeg. Stir gently to combine.
2. Shred zucchini, lightly packing it down as you measure it.
3. In the bowl of an electric mixer beat egg whites, applesauce, oil, sugar and vanilla extract. Mix very well. (You don’t want to over beat quick breads after the soda and baking powder are added, but since this is just the liquid part, and especially with the egg whites I think it helped to add air to the batter.)
4. Slowly add the dry ingredients (about ⅓ at a time) mixing as you go – then beat well to fully combine.
5. With a rubber scraper or wooden spoon, stir the shredded zucchini, cranberries and nuts into the batter and mix well.
6. Pour half of the batter into each prepared pan.
7. Melt the Smart Balance and brush on the top of each loaf.
8. Mix the sugar and grated lemon rind together and sprinkle on top of each loaf.
9. Bake for 45 to 60 minutes or until a toothpick inserted into the center of the loaf comes out clean. (The bake time will vary depending on how much shredded zucchini you add to the batter.)
It is once again time to focus on one of the amazing staff members who helps me in so many ways behind the scenes here at the Studio. Today, I’d like you to meet Elaine Kelly.
Elaine in Tel Aviv earlier this year at the start of her family’s visit with her daughter Allison.
I first met Elaine when she came to my Hilton Head Seminar back in 2005. She made quite an impression on me and after Seminar ended that year, I asked her if she would like to be on the staff the following year. Elaine’s insight was invaluable in many ways and when I called a halt to those yearly events and focused on the Studio itself, she was right there helping me totally change the way we do our marketing. Now, Elaine has moved on to being the writer of my many patterns, taking the designs and presenting them to you with easy-to-follow directions.
This is a quilt that Elaine did for Jinny’s last seminar. She says about this quilt, “I tried to incorporate a large number of Jinny’s techniques (shading, fracturing) and raided my stash of Japanese taupe fabrics.”
Elaine was born and raised in Toronto, Canada, and began sewing, as many of you did, in home ec class in seventh grade. In one of her first sewing projects, a blue corduroy jumper with ruffles on the straps, the teacher told her she put enough pins in that if they were melted down they would provide enough metal for all the ammunition needed in World War II. Elaine is still a confirmed pinner to this day.
Her interest in quilting started when she attended Waterloo College in Ontario where she found nearby a large Mennonite community and their beautiful quilts. Determined to give quilting a try herself, she bought a book and, with no rulers or rotary cutters, she machine pieced and hand quilted her very first quilt.
Hillside is an original design based on an unattributed photograph from Pinterest.
Elaine is particularly drawn to antique quilts. She loves to figure out how they are made, what values to use and the best way to simply “make it work.” As another confirmed baseball fan, each year she starts a baseball quilt to work on by hand during the season while she watches our beloved Washington Nationals.
Baseball Quilt was Elaine’s hand-sewing project from last year. The center motif is from Ann Orr’s 1930’s Autumn Leaves design; the rest is original. She used vintage leaves, yo-yos and 9 patches from the 1930’s and 40’s, purchased on eBay.
This year, she has also been trying her hand at natural dyeing with products such as avocado skins, Queen Anne’s lace and goldenrod (which, unfortunately, turned her hands yellow this morning). She hopes to soon have enough hand-dyed fabrics to start a quilt.
Besides all of her work for the Studio and her time set aside for quilting, Elaine has a wonderful husband and two busy children both in college, plus, they are building a vacation home in rural Pennsylvania.
Buttons’ Valentine is only about 6″ x 8″. It’s a thread painting of one of Elaine’s son’s stuffed “friends” from childhood, sent to him when he was away one Valentine’s Day.
Elaine is an amazingly talented woman and her expertise has been invaluable to me in so many ways. Most importantly, I am happy to have her as a friend………AND she is always willing to come pick excess veggies when my garden is overflowing. An excellent cook, she finds ways to use zucchini and cucumbers that you would never imagine.
People have been fascinated with interlocking designs throughout the ages. I became interested in this type of design in the 1990’s and diligently studied the work of Dutch artist M.C. Escher to try and figure out how he created his amazing tessellations. One day the light bulb went off and it all fell into place. It is so simple!
The first question is “What is a tessellation?” A tessellation is any shape that can be repeated over and over to fill a surface without gaps or overlaps.
Squares, triangles, hexagons, and diamonds are all tessellations because they can fill a surface without gaps.
Those are easy to see, but the more intriguing tessellations contain more complex, interlocking shapes. There are a few rules to follow and these rules must be adhered to or the shape will not “tessellate”.
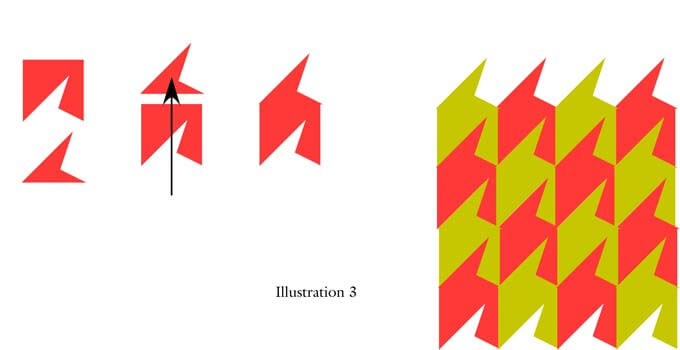
So the number one rule is that you must begin with a base shape that tessellates. Number two is that you must give it back to the side of the shape that is equal in length. It makes a difference which side you give it back to or whether you flip or rotate the shape. Here are a few designs with this simple square and several of the patterns that can be created by merely putting the cut piece back in different ways.
Lets look at the simplest of the tessellations, the square. It is easy to see how it can repeat over and over to fill a surface without gaps. But what happens if I take a chunk out of that square? It is no longer a tessellation.
So here is the “aha” moment. The secret to creating tessellations is this: if you take away a piece of a shape, give the piece back to another side of the shape. You will once again have tessellation because the piece you give back will fit into the hole of an adjacent piece where it was taken away.
There are a variety of ways to give a shape back and a few rules that must be followed. You can rotate the piece or not depending upon the shape used. I wrote an entire book on this called Designing Tessellations. Unfortunately it is out of print, but it is still available as an “e-book.”
I am currently working on an online class that will be offered through my website sometime in the future. It will cover all the rules, shapes that can be used, how to turn the shape into a usable pattern for quilting and much more!
I’ll keep you posted as to when it will be available but for now, why not come to the Studio and take a class in person. I will be teaching Designing Tessellations August 11 & 12.