Posted on 12 Comments

Charm Quilts

So, what is a Charm Quilt?

A charm quilt is a quilt that is usually made with a single shape and where each piece is cut from a different fabric. Squares, rectangles, hexagons, triangles and diamonds are probably the most common shapes used but others can be used as well. This is a fun project to work on in a quilting group, where you can trade fabrics with each other.

In this blog we start off with probably the easiest shape to work with, a square. The squares can be arranged in a variety of different configurations. But the best way to proceed is to have some type of unit. Then just sew units together and in the end the units can be arranged to balance out color.

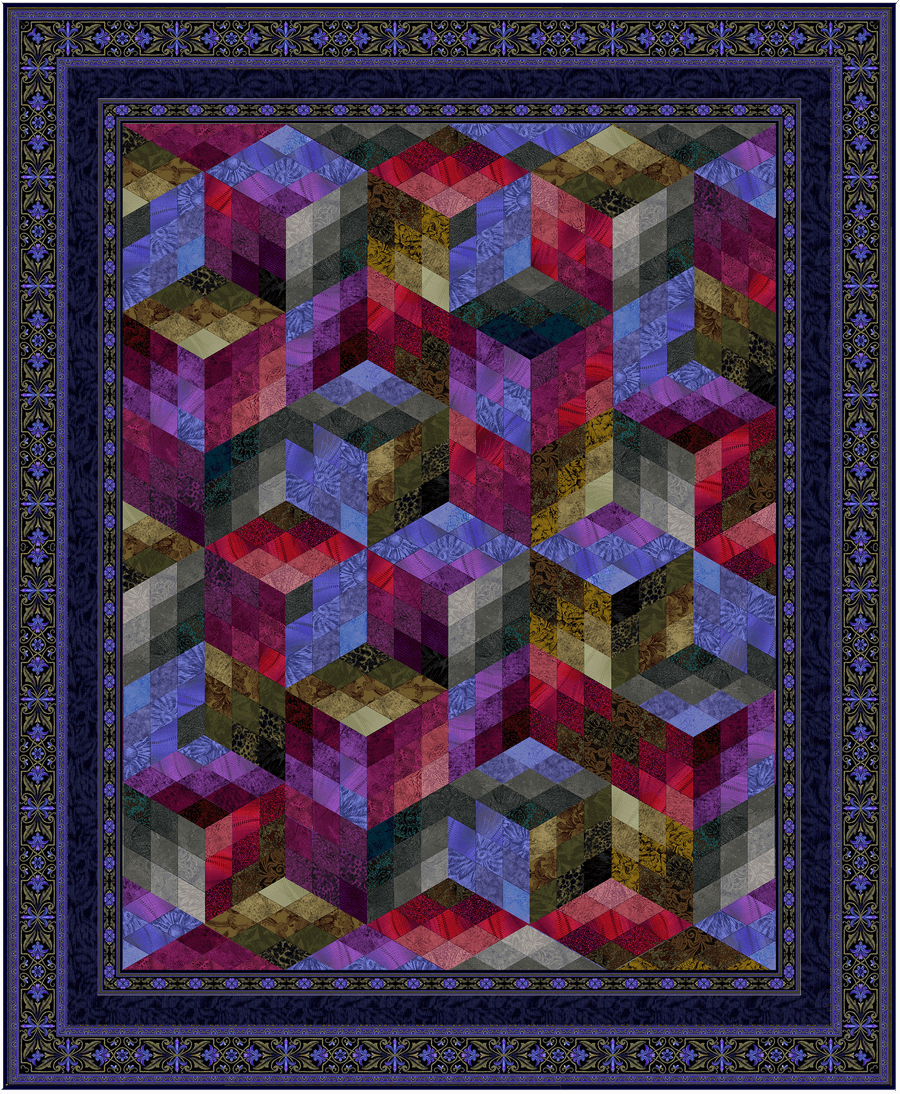
The quilts shown here have basically the same layout. At first glance the first one, made with 3 ¾” finished size squares, appears to have those squares randomly sewn together. But a closer look shows four patch units with two squares in one block lighter than the other two. Then those squares are sewn together.


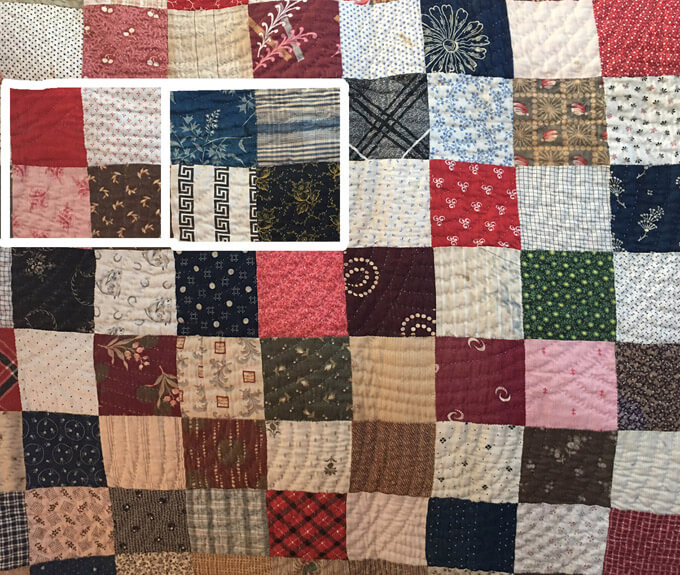
You can very clearly see the four patch units in Square Charm Quilt 2. Made with 2 ½” finished size squares, this quilt was very clearly made in four patch units with the lights quite a bit lighter than the darks.


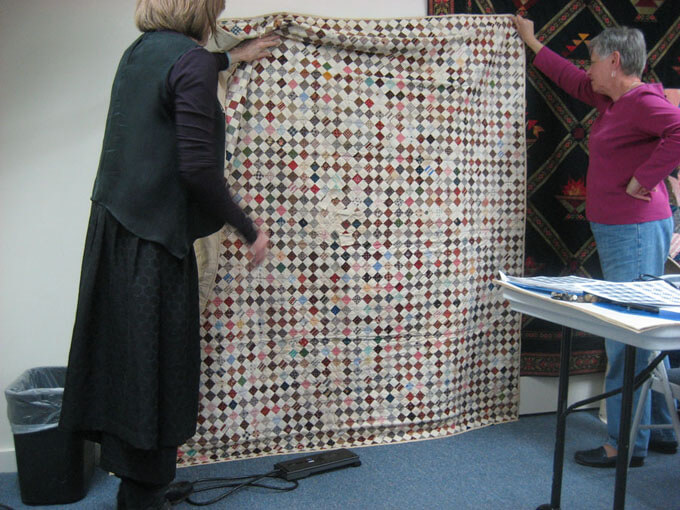
Square Charm Quilt 3 is probably one of my favorite Charm Quilts. It was also constructed with four patch units. This time the printed fabrics were combined with a solid colored light fabric. The 1” finished size pieces are then sewn together. In the very center of the quilt is a patch with the following words, “This quilt contains 1,844 calico pieces, no two alike.” Several notes have been attached with basting stitches to some of the calico pieces. The notes contain the name of a person. My guess is that those particular fabrics came from the person whose name is on the notes.


Now you may be wondering why it is still considered a charm quilt even though all of those background fabrics are the same. You will often find a common background fabric in these quilts acting as a unifying factor. However, all of the other squares are different so it is still considered to be a charm quilt.

By now most of us have large stashes of fabric. Pull out those fabrics and stay tuned for more coming later this month on ways to make charm quilts with a variety of different settings. In the meantime, start collecting your squares or whatever shape you want to use.

Posted on 5 Comments

Selecting and Placing colors and fabrics for scrap type quilts, Part 2 Assembling the Quilt

In my last post, I discussed my Day Lilies quilt and how to plan fabric and color schemes for this and any “scrappy” quilt. Today, I’m continuing that discussion.


Step 1.

For any scrappy quilt, I think it would be impossible to try and plan the placement of every piece in advance. I like to work in units, making sure that the balance of color and fabric placement within each unit is satisfying to me.

For Day Lilies, my unit was one petal. I made stacks of brown, red and purple petals, using a wide variety of different fabrics.


Depending on your pattern, you may have just random placement of dark, medium and light within the units such as is done with Thousand Pyramids.


Or you may have colors shaded light to dark within each unit such as Day Lilies above or Urban Sunset shown here.


When working with shaded units, I have a little trick to make easily get several different units. Lay out a group of fabrics in a “run,” light to dark. Here I have such a run which I might use for Day Lilies. There are 11 fabrics.


I only need seven fabrics for a Day Lilies petal so I could make one unit using in order fabrics 1-7, for another petal I could use 2-8, then 3-9 and so forth. This will yield five different petals. Continue doing this with different runs of shaded colors.

For Urban Sunset, some of the nine-diamond units are shaded light to dark lengthwise and some are shaded light to dark sideways as seen above.

For these units, I did the same thing as shown above on Day Lilies. I arranged several “runs” of fabrics such as this one which contains nine fabrics shaded light to dark.


Since only five fabrics are needed for each unit in this quilt, there are five possible units that can be made shading them lengthwise and five sideways for a total of 10 different units. The lengthwise shaded ones are shown here.


When I find a unit with colors that I like, I will make at least two of the same colors. They will be used in different parts of the quilt so that the same units are not adjacent to each other. The Urban Sunset Pattern shows how the smaller units are formed into the increasingly larger units.

Once I have a good amount of what I call the “base” units, I will start arranging them into larger units. For Day Lilies, it is the large flowers by color – purple, red and brown.


For Urban Sunset, it is the larger units that are built according to the directions in the pattern.


For Thousand Pyramids you will make two sets of units one with the dark triangles at the bottom and one with the light triangles at the bottom. These are then alternated in the layout of the units.


After the larger units are sewn together then is when I finally like to lay them all out on either a design wall or the floor and arrange them to my liking. You will find that if you are satisfied with the base units and then the larger units, you will be pleased with the overall arrangement.

I find that if all the pieces of the quilt are decided upon in advance, it does not allow for the quilt to “speak” to you. Some of the spontaneity is lost and for me part of the pleasure of making a scrappy quilt with lots of fabrics is the discovery along the way.

Posted on 5 Comments

Selecting and Placing Colors and Fabrics for Scrap Type Quilts, Part 1

We had a huge response to my quilt, Day Lilies, when we placed it at the top of our Facebook page. There were many requests for a pattern and kit to make it. There is a pattern available. It is in my book Quiltmaking By Hand, along with several other patterns. But I will tell you why there is no kit and give you hints on how to plan color schemes for any “scrappy” quilt.


First and foremost, I used more than 120 different fabrics in Day Lilies and most other scrappy type quilts I have made. It would be impossible to make kits with that many fabrics and have them at an affordable price. Furthermore, some people want to know the placement of each and every fabric. It is better to understand how to do it than to try to copy something exactly.

Selecting the Colors

Why so many fabrics in Day Lilies, for example? The base design is a hexagon which means that If you look carefully at the quilt you will see that there are three colors of lilies—reds, browns and purples. Because of the hexagonal arrangement, the lilies are arranged so that no two flowers of the same color touch, thus the three colors.


Now, a closer look reveals that each lily is made up of six petals and each petal has seven pieces. Those pieces are shaded light to dark.

Even if you used exactly the same fabric in each petal of a color you would need 21 different fabrics—seven reds, seven purples and seven browns.


Then you would have “spotlights” of colors without any blending or variance of the pieces once they are assembled.

A closer look at my quilt shows that within any one flower each petal is different. Sometimes a red petal might shade into a hint of brown or purple, or a purple might shade into a hint of red and so forth. This achieves a better blending of the colors in the final quilt.


So how do you select the colors in the first place? Rather than repeat myself and write it all here again, I urge you to watch the two following videos which explain my basic philosophy of color and how I put fabrics together. Go to the “Tips and Lessons” page of my website and choose “Design and Color.”  Then watch these two videos:

  • “Jinny’s Color Secrets”
  • “Choosing Quilt Colors with the Portable Palette”

Now try these steps in selecting a palette of colors for your scrap quilt.

  • Select the colors you would like to use and have several values of those colors ranging from light to dark.
  • Add whatever additional colors you need to shade those colors together.
  • Make sure you have a “deep dark” fabric, an “accent” and several neutrals.

If you are uncertain where to begin, take a look at the pre-cut section of our web site.

https://jinnybeyer.com/product-category/fabric/pre-cuts/

There you will find several bundles of 30 or more color coordinated fabrics that are shaded together.  Find one that appeals to you and once you have those fabrics, go to your stash and pull out any fabrics within that color range, the more the better.  Here are some that I recommend:

  • Desert Dawn
  • Emerald Isle
  • Indian Marketplace
  • Moon Glow
  • Protea
  • Rainbows End
  • Urban Sunset
  • Zinnias

Indian Marketplace is a good start if you like the colors in Day Lilies. Urban Sunset is the one I used for the Urban Sunset quilt.


Take some time to look through your fabrics and make selections.  Next week, I will talk about placing those fabrics in the quilt.

Posted on 1 Comment

Creating a tessellating design from a traditional block.

We get questions periodically from our blog or from Facebook. One came in recently from Catherine S. who said she was looking for an old tessellating pattern of mine called Wind Chimes. I looked for it in my encyclopedia of more than 4,000 pieced patterns, The Quilter’s Album of Patchwork Patterns. It wasn’t there so I realized I must have forgotten about it and failed to include it in the book. I then searched for the name on my computer and found it! I designed it in 1999.


I realized that this block was a good subject for a blog (thank you, Catherine), mainly because it illustrates how different a design can look and how you can create an interlocking or tessellating pattern from a traditional design.

First of all, the block itself is an adaptation of an old traditional block known as Windblown Square or Balkan Puzzle. I made two changes in that block to create Wind Chimes. I divided the center square into triangles and eliminated the lines shown.


Most people would color either of those two designs in a traditional way as shown below.


However, to create an interlocking or tessellating design you color it differently. Two opposite quarter sections are colored dark and the other two opposite quarter sections are colored light.


To get the interlocking effect, four blocks are pinwheeled with the darks coming together at the center; then these four block units repeat to form the design.

In the original quilt I did not color the center triangles light and dark but used a border print in those four triangles. It is easier than it seems to create a border print square by fussy-cutting four identical triangles from a border print fabric. Click here to see my lesson on how it’s done. 


Through the years, I have taken many traditional blocks and made subtle changes to give them an entirely different look when made into a quilt. Give it a try. You’ll be amazed at what you can create.

I will be teaching a class on Designing Tessellations at the Studio next week for all of you who are interested in this fascinating technique, there are still some openings. Hope to see you there!


Posted on 190 Comments

New Block of the Month for 2017

Graphic for Blog


For the last several years I have been offering a free block of the month quilt pattern to subscribers to our monthly newsletter.

A few months ago, we sent out a survey asking what type and style of project you would like to see for next year’s Block of the Month and we have taken your suggestions to heart. The most popular design ideas were:

  • Wall hanging
  • Medallion style
  • Piecing and appliqué
  • Mystery quilt

For 2017, we have listened and took your suggestions. Instead of a full size quilt, the project is smaller, only 47” x 47”. It is medallion style and it is a mystery quilt with both appliqué and piecing. Instead of a block each month there will be portions of the design to put together.

I have designed the quilt to be a learning experience and it incorporates various piecing techniques so that by the time you finish you will be able to tackle any patchwork project.

Many of you know that I sew all my quilts by hand. One of the reasons is that handwork is portable and you can take it anywhere you go. I have seen a real resurgence of interest in hand piecing the last couple of years and this quilt is a great project to do by hand even if you have never tried hand piecing before. Each clue is a learning step to the next one and, if you choose to sew by hand, by the end of the year you will be an expert. If you prefer sewing by machine, the pattern is written for both hand and machine sewers.


Taping Take Two
Our classroom was transformed into a film studio to produce the videos for the new BOM mystery quilt. We were lucky to find a videographer right in our neighborhood, Adam Vogtman.


We will begin with simply sewing a straight line, then joining four points, curves, eight points, setting in seams, appliqué and so on. There will be video clips to go along with the clues with links to these in each newsletter. The quilt is not a huge project and you should easily be able to complete each clue during the month.

I have designed this quilt in the four colorways shown above. You can pre-order your kit and it will be shipped starting January 20th, so by the time the first clue comes out in February you will be ready to start!

In order to receive all the clues for the BOM, you must be a subscriber to our free monthly newsletters. The links to all patterns and videos will only be in our newsletter. If you have not yet signed up you can do so here.

Watch for more information on this program in Saturday’s newsletter. I hope you are as excited about this as we are.

Posted on 8 Comments

Lucy Boston Patchwork of the Crosses Block

From the time I first began quilting I experimented with ways to “fussy cut” fabrics to give interest to the blocks I was making. Unbeknownst to me during that same time, an Englishwoman named Lucy Boston (1892-1990) was doing her own experimenting with fabrics and she created many spectacular quilts, probably the most famous being her Patchwork of the Crosses.


With the renewed interest in hand piecing and working with mirror-imaged fabrics, Lucy’s Patchwork of the Crosses block has become very popular. The block is made with with a single shape–the honeycomb (elongated hexagon). The blocks are then joined with squares.


Some people stitch the blocks in the traditional manner and some use the English paper piecing technique. No matter which technique you use, the most fun part is seeing how many different ways you can cut the fabric to create different effects.


I experimented with the Patchwork of the Crosses block using just two border print fabrics. Typically a mirror-imaged motif is centered in the middle of the template, such as you see here.


But what happens if you deliberately “skew” the template so that the mirror-imaged motif is not centered?


Mark a portion of the design onto the template and then flip it and find the mirror-imaged counterpart.

That technique was used in the corners of the two blocks shown above.

As we began playing around with Lucy Boston blocks and hexagons, or “hexies,” last year, we began to carry acrylic and paper templates for these projects making the process faster and easier. We also have some tips on our website for fussy cutting border prints for these projects. We’ve been having so much fun with these. Why don’t you give it a try?


Posted on 2 Comments

Patriotic Quilts

The new McCall’s magazine, The Best of McCall’s Quilting – 22 of Our Most Popular Patterns, features a quilt I designed for them several years ago, Lone Star Salute.

lone star
Lone Star Salute

Upon seeing it again and with the election in the forefront and the Fourth of July approaching, I began thinking about commemorative quilts. We have certainly seen many patriotic-themed quilts over the years and, I must admit, I have done my share to add to the pool of these types of quilts. Some of them are personal quilts and others are ones that I designed for patterns.

Dolly Madison Star
Dolly Madison Star

In 1976 when I had been quilting for only four years, a friend asked me if I was going to make a quilt commemorating the bicentennial. I hadn’t thought about it but decided that was a good idea. While I think the overall design and balance leaves a lot to be desired, I learned a tremendous amount during the process of making it. First of all, I wanted the blocks in the quilt to have been named for some event in our country’s history. I have blocks such as Dolly Madison’s Star, 54-40 or Fight, Mrs. Cleveland’s Choice. I even Patchwork Patternscreated my own block of the bicentennial logo.

All of those blocks were to be a 10-inch finished size.  Since I knew it would be impossible to find all the patterns in a 10-inch size, I had to figure out how to draft all of those designs. Intrigued by the drafting process, I began teaching pattern drafting to my students and that lead to my first book, Patchwork Patterns, published in 1979.

Drafting the 50 five-pointed stars to fit into a larger five-pointed star was a challenge but I eventually figured out how to do it. Another challenge was fitting exactly 200 triangles into the border that surrounds the central motif.

bicentennial quiltMy quilt Windows was another commemorative quilt with a red white and blue theme that I made following the terrorists attacks on September 11, 2001. I wanted at least one piece in the quilt for each of the victims of the attacks. In the end, the quilt has 4,777 pieces.Windows largeThe patriotic quilts I have designed which have patterns available include Lone Star Salute, shown above, September Sun, another that was designed shortly after the terrorists’ attack, and Fourth of July Star. Smaller projects include my new Wings wall quilt and our row for this year’s Row By Row shop hop, Eagle’s Pride.

September Sun
September Sun
Fourth of July Star
Fourth of July Star
wings quilt sm
Wings
row 2016 photo
Eagle’s Pride, 2016 Row by Row, available in shop only

Why don’t you give a try at creating a patriotic-themed quilt.

Posted on 8 Comments

The Symmetry of Patchwork Blocks

Island TropicsOur web special this week is a bundle of coordinating fabrics. It’s easy to look at a bundle like this and admire the pretty colors. It takes a little more imagining, though, to figure out what to do with it. To help you out, we selected three different free pattern downloads as possible choices for using those fabrics. Two of the blocks are shown here.

First image for blog

Normally we just think of putting blocks together side by side, and all facing in the same direction. Blocks that have coloring that are non-symmetrical, or are symmetrical in just one direction can also be arranged in a variety of other ways.

For instance, we are used to seeing the Irish Chain block put together with the blocks side by side, and all oriented in the same direction.

4. Double Irish Chain col quilt 1But what happens if you pinwheel the blocks? You get a completely different look.

5. Double Irish Chain quilt 2a

6. Double Irish Chain quilt 2Here are 5 different layouts of the Triangle Charm blocks.

Blocks side by side oriented in the same direction.First set

Blocks pinwheeledImage 2

Blocks pinwheeled and then mirroredImage 3Four blocks mirrored and then those units side by sideImage 4

Four block unit all oriented the same way and then those units mirrored.Image 5It is fascinating to play around with all the possibilities. Which is your favorite?

Note: If you would like to recreate these blocks and use them in a quilt, please use the free patterns for guidance as to how much additional fabric you will need.

Triangle Charm: fabric 7 is 5748-02 and fabric 8 is 0213-10
Double Irish Chain: background fabric is Palette #58, 7132-25

Posted on 28 Comments

Copyright Laws & Quilting

Lotus Amazon BlogQuilting and the copyright right laws which apply to the subject come up every now and then in magazines and online. Each attempts to summarize and explain the law often with different interpretations. If you are anything like me, it just takes a little bit of “legalize” for my eyes to glaze over. Protecting the rights of others is important but sometimes it is a little difficult to figure out what it all means. A recent post found on the internet brought this all to mind.

Ginger Davis Allman came up with this wonderful chart of copyright guidelines. http://thebluebottletree.com/copyright-guidelines-polymer-clay-artists/

Copyright-Infographic-craftersJust as a lawyer would, I will start this with a brief disclaimer. I am not a lawyer, never dreamed of being one and know very little about the law. Nothing I am about to say should be construed as legal advice. I simply want to talk about what is fair and considerate to others.

A copyright is a form of legal protection granted by the legal system to protect the original work of individuals. According to the Studio Art Quilt Associates (SAQA), “Works eligible for protection under copyright include patterns, diagrams and instructions for making quilts, written materials that talk about quilts and the making of quilts, and quilt designs, regardless of whether those designs appear in a pattern or diagram for the quilt, in a software program that lets the user make the quilt, or in the quilt itself.”

Many of us design our own quilts whether we do it professionally or just for our own enjoyment. Let’s use my Lotus quilt as an example.

Lotus green center

The center of the quilt consists of a large Lone Star. This is a traditional design and I certainly can’t lay claim to that. I carefully chose each fabric making sure they shaded nicely to get the effect I wanted. Around the Lone Star is appliqué which I also designed. This is my own creation.

Lotus green applique1If you make my Lotus quilt, I would hope that you let people know it is my design. If your friends want to make one, you can let them know where they can obtain a pattern or a kit. It is not alright to take the pattern, make copies and distribute them whether for free or certainly not for money.

If you want to take parts of this design and incorporate it into a work of your own, give credit. If your work includes anything for profit, you should ask permission of the designer.

I would hope you would stop and think for a moment of all which goes into the creative work of others—endless hours of design, pattern writing, pattern testing and copying costs. There is an old saying about giving credit where credit is due. Let’s always try to remember this.

Posted on 4 Comments

I’m just saying….

Hand sewing resizedIn 1974 when I taught my first quilting class, everyone in my class knew how to sew. They grew up sewing, knew how to thread a needle, take a stitch, etc. I grew up sewing my own clothes and making doll clothes…..often making my own patterns, so transferring that to quilting was not difficult.

Grandmother's Flower Garden
Grandmother’s Flower Garden

Schools no longer teach sewing to all students, mothers work and few sew. Most beginning quilting students I have in my classes are not just new to quilting but are also new to sewing. When someone wants to take up quilting, they think the first thing they need to do is purchase a sewing machine.

Garden Sunflower done in.....
Garden Sunflower

When I became interested in quilting in the early 70’s, templates were made for all patchwork patterns and almost all piecing was done by hand. Today many people pass up on patterns that require templates or ones that cannot be done by machine. They only want patterns where the pieces can be cut with a rotary cutter.  This eliminates a whole wealth of patterns and in my opinion eliminates a lot of the intricacies that were found in many of the quilts from the 1970’s and 80’s.

Suzie's Box
Suzi’s Box

Why not take a step back, look at some of those more intricate looking patterns and try one. If you want to take a try at a pattern that uses templates, sign up for my 2015 Block of the Month free class from Craftsy.  The early lessons have a lot of information on making templates and hand sewing which can be used in any pattern you may choose. Or, try the Quilter’s Design Board on my website. There, you can choose from hundreds of blocks, see how it looks in a quilt and print templates.

titleCard

I’ve been thrilled with the number of you who have discovered the joys of hand piecing and told me how much you (sometimes surprisingly) enjoy it. If you haven’t already, why don’t you give it a try.