Posted on 22 Comments

Charm Quilts Part IV

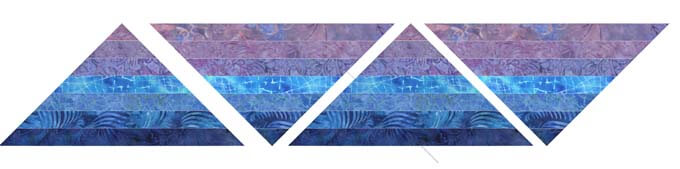
For the last few months, I have been sharing with you some of the quilts from my antique charm quilt collection. I have told you that one of the easiest ways to work with them is to create a unit and then use the same value placement in each block. But many quiltmakers experimented with other layouts of the pieces in ways to showcase each of the different fabrics. The quilt at the beginning of this newsletter is one example.

Quite a few of my charm quilts have radiating rings going from the center outwards. The right triangle in last month’s quilt can be used for these radiation ring designs as well. In this first one, it appears that the maker separated the pieces into lights and darks and then, depending on how many of the two groups there were, added the pieces one row at a time. The first ring is dark, then one ring of light, three of dark, one of light, two of dark and so on.


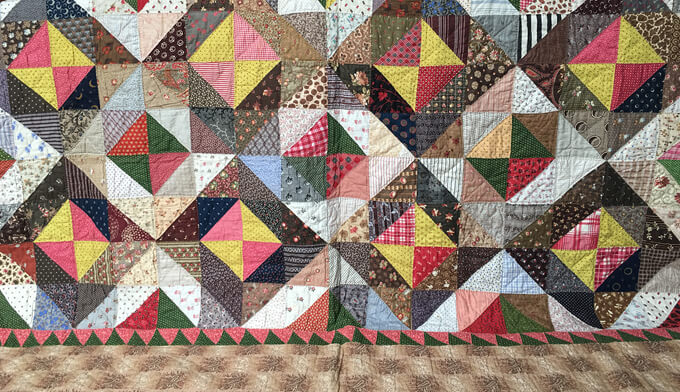
The maker of the second quilt has not only organized the pieces by light and dark but by color as well. Single rows of lights and darks have been alternated but the rings follow a color pattern as well. I like the way the red pieces in the center balance with the red ring further out. The same holds true with the dark blues.


An equilateral triangle has been used for the radiating rings in this next quilt. The rings are alternated lights and darks. The lightest fabrics are used in the center ring with the fabrics in each successive “light” ring being darker.


I love to look at the individual fabrics in a charm quilt and see what the maker had in mind. In this particular quilt, there are some very interesting fabrics that have been used. One of them is a “cheater” panel that was printed in the 1850’s. I don’t know if all of the cat and dog motifs in this quilt are from the same panel or more than one. But the maker felt because there were different motifs, it could be part of the “charm.” The other fabrics seem to indicate that this quilt was completed in the 1880s.


In this fourth quilt, the charm pieces are hexagon fabrics. Once again, the fabrics were sorted into lights and darks and then by color. The maker had very few green fabrics and I like the way they were arranged in the fourth ring from the center. Likewise, all the pink fabrics form one of the rings. Of particular interest to me is that there are a lot of striped fabrics in the quilt. A close examination shows that all of those fabrics have the stripes oriented in the same direction.


Which of these do you like best?

Posted on 3 Comments

Tropical Paradise

In my last blog I talked about taking a block design and making it with multiple fabrics for a scrappy effect. That blog has information that is helpful in understanding how I placed the fabric in the blocks used in this blog as well.


I was so excited about this painting my niece, Tanis Rovner, painted that the colors in the image inspired our Tropical Paradise bundle. Since this is such a popular color scheme, I decided to show how you could use all of the 14 fabrics we put in the bundles in a block that would normally use six or seven. This is just what I did in Desert Star and can be done for any quilt that could be made with only three fabrics.

Both of these blocks are free patterns that are in our Quilters’ Block Library on our web site. I chose the 12” pattern for 1904 Star and the 10” pattern for Attic Windows

Beginning with 1904 Star, notice that the light, medium and dark value placement is the same in each of the two blocks I created but most of the fabrics are different between the two. I was able to use all 14 bundle fabrics between the two blocks and then I alternated them in the quilt.


I created these blocks and quilt digitally but if I were actually sewing them, I would find it boring to repeat the exact same blocks throughout. For me the fun part is experimenting with lots of different fabrics that fall within the same color scheme. It is a good lesson in color and value placement to make each block different. If you like the colors in the Tropical Paradise bundle, begin with it and then go to your stash and find as many colors as you can within the same range.

TIP

If you can’t find as many fabrics as you want in a certain color, did you know that you can sort fabrics on our website by color? You can go to this link and then advanced search and select the color range you want and click on “GO”.


The second block I experimented with is Attic Windows. While this particular design can be made with just three fabrics—a light, medium and dark—it is perfect for a scrappy looking quilt. All fourteen fabrics in the Tropical Paradise Bundle have been used in these two blocks and then the blocks alternated in the quilt. Once again, as with 1904 Star, I would make each block with a variety of different fabrics to add to the scrappy look. I try to get a good balance of value and color within each block, so the colors just meld together, and the blocks disappear when they are assembled.

Please note that even though there are three values, each of the darks do not have to be very dark and the mediums do not all have to be the same value. Depending on the effect you want you can also use different lights for the lightest value in the quilt. As long as the medium piece is lighter than the dark next to it, it still reads as “medium”. Same with the mediums and lights. Sometimes one fabric might be used as a dark in one block, but a medium in another.


I always like to add a border to finish off a quilt. It is like adding a frame to a painting or piece art. Borders can be all one fabric, more than one fabric, border prints or pieced or appliqued. Some people prefer no border at all. In any case, the borders should carry out the colors from the inside. The colors of the border can drastically affect the color image the entire quilt portrays. You can see the no border options above and two different options below with these two quilt designs.


Posted on 5 Comments

Selecting and Placing Colors and Fabrics for Scrap Type Quilts, Part 1

We had a huge response to my quilt, Day Lilies, when we placed it at the top of our Facebook page. There were many requests for a pattern and kit to make it. There is a pattern available. It is in my book Quiltmaking By Hand, along with several other patterns. But I will tell you why there is no kit and give you hints on how to plan color schemes for any “scrappy” quilt.


First and foremost, I used more than 120 different fabrics in Day Lilies and most other scrappy type quilts I have made. It would be impossible to make kits with that many fabrics and have them at an affordable price. Furthermore, some people want to know the placement of each and every fabric. It is better to understand how to do it than to try to copy something exactly.

Selecting the Colors

Why so many fabrics in Day Lilies, for example? The base design is a hexagon which means that If you look carefully at the quilt you will see that there are three colors of lilies—reds, browns and purples. Because of the hexagonal arrangement, the lilies are arranged so that no two flowers of the same color touch, thus the three colors.


Now, a closer look reveals that each lily is made up of six petals and each petal has seven pieces. Those pieces are shaded light to dark.

Even if you used exactly the same fabric in each petal of a color you would need 21 different fabrics—seven reds, seven purples and seven browns.


Then you would have “spotlights” of colors without any blending or variance of the pieces once they are assembled.

A closer look at my quilt shows that within any one flower each petal is different. Sometimes a red petal might shade into a hint of brown or purple, or a purple might shade into a hint of red and so forth. This achieves a better blending of the colors in the final quilt.


So how do you select the colors in the first place? Rather than repeat myself and write it all here again, I urge you to watch the two following videos which explain my basic philosophy of color and how I put fabrics together. Go to the “Tips and Lessons” page of my website and choose “Design and Color.”  Then watch these two videos:

  • “Jinny’s Color Secrets”
  • “Choosing Quilt Colors with the Portable Palette”

Now try these steps in selecting a palette of colors for your scrap quilt.

  • Select the colors you would like to use and have several values of those colors ranging from light to dark.
  • Add whatever additional colors you need to shade those colors together.
  • Make sure you have a “deep dark” fabric, an “accent” and several neutrals.

If you are uncertain where to begin, take a look at the pre-cut section of our web site.

https://jinnybeyer.com/product-category/fabric/pre-cuts/

There you will find several bundles of 30 or more color coordinated fabrics that are shaded together.  Find one that appeals to you and once you have those fabrics, go to your stash and pull out any fabrics within that color range, the more the better.  Here are some that I recommend:

  • Desert Dawn
  • Emerald Isle
  • Indian Marketplace
  • Moon Glow
  • Protea
  • Rainbows End
  • Urban Sunset
  • Zinnias

Indian Marketplace is a good start if you like the colors in Day Lilies. Urban Sunset is the one I used for the Urban Sunset quilt.


Take some time to look through your fabrics and make selections.  Next week, I will talk about placing those fabrics in the quilt.

Posted on 14 Comments

Celebrate National Poinsettia Day

One of my favorite things to do is to find a beautiful Image, extract the colors from the image and then find fabrics to go with those colors. It’s a great way to experiment with color and to select a beautiful palette for a new project. So, in honor of National Poinsettia Day on December 12, I worked with a photo taken at a local business, Merrifield Garden Center, by one of our staffers, Nancy, and created a bundle of fabric that is also this week’s web special.


In addition to the fabrics, I wanted to give you a suggestion for a project which uses these fabrics. I’ve chosen the block, Triangle Charm, from our Quilters Block Library . This is a free pattern which can be downloaded in a 6, 10 or 12-inch block. I selected a 10-inch block. This allows you to easily cut the triangles from 3-inch strips.


A half yard bundle will give you plenty of fabrics to make sixteen 10 or 12–inch blocks with leftovers for other projects. You will need additional fabrics for your choice of border.

The block is an easy one made with a simple right triangle. The final outcome of the design is reflected in the amount of each color used. The secret is in the shading and there are a variety of ways to shade it. For this blog, I have chosen two variations. Block 1 has more darks with the lights giving the sparkle and Block 2 has the color shading reversed so there are more lights in the quilt. Both have exactly the same fabrics from our Poinsettia bundle.


Block one and block two


Select the block you prefer then layout and arrange one block to use as a fabric placement reference for the remaining ones.

In the layout I have used, half of the blocks are made one way and the other half are reversed. Block 1 is used here.


First, four of the regular blocks are pinwheeled. Make two of these regular pinwheel units.


The reverse blocks are also pinwheeled as shown below. Make two of these.


Arrange the regular and reverse pinwheel units as follows:


In past blogs I have talked about proportions of color and how different a quilt can look depending on how much of each color is used.  The color impact of this same design, using block 2, which contains more light colors is quite striking.


Quilt made with block one and quilt made with block two


To me, adding a border to a quilt, is like putting a frame on a painting. It finishes off the design. Like paintings, some quilts do not call for a final “frame” but for the most part, I like to add some sort of border, usually a “border print”. Click here to see a video demonstration of how to put a border print frame on a quilt and achieve perfectly mitered corners.

Here are four different border print frames. Two yards is sufficient if using the 10” version of the block. Some borders suit the darker version of the quilt and some the lighter version.


Casablanca red border, 2795-04


Casablanca brown border, 2795-02


Sophia border, 1280-05


Ashford border, 1695-41


I hope you enjoy playing with these fabrics.  Let us know what you choose to do with them.

Posted on 2 Comments

Last Rainbows’ End Bundle

For some quilters, choosing fabrics for a scrap quilt can be a daunting and confusing process.  Any of our grand bundles work very well for scrap-type projects and designs. The web special this week features the last mini-bundle of the Rainbows’ End Grand Bundle. If you have collected all five of the mini-bundles you have a great collection of fabrics for any scrap project.

A very good example of this would be the quilt I designed for this year’s Quilters’ Quest shop hop. For that quilt, we chose colors of fabric bound books and I called our quilt “Open Book.” (See my October 1 blog.) But the design will look equally good in other color schemes, including the Rainbows’ End  Grand Bundle.

We are in the process of reworking the Open Book pattern for a scrap quilt project, so even if you did not attend the Quest you will still be able to make the quilt. The pattern will be available within the next couple of weeks. Meanwhile, make sure you have all five of the bundles because these colors and fabrics would be perfect made into Open Book.

Posted on 7 Comments

Backgrounds Make a Difference

Last month we introduced Group 2 of the Rainbow Grand Bundle. Using my quilt pattern Night and Day as an illustration, I wrote a post about the proportions of colors, how they can change the appearance of a quilt design and how different a design looks with either a very light or a very dark background.


Night and Day with a light background.


This month, going a step further, I illustrate the same fabrics in the same strip configurations but with a medium color as the background. The second border had to be changed to one of the dark fabrics because there was not enough contrast between it and the background fabric used in the remaining borders.

As promised, the revised pattern using 28 fabrics rather than the original 14 is now ready for you to download for free.


Last month’s versions of Night and Day.


Which version of the designs shown this month and last is best? We all have different opinions so it is up to you to pick your favorite!

Jinny

Posted on 5 Comments

Proportions of Color

With the second mini-bundle of our Rainbow’s End Grand Bundle coming out this week as part of our web special, it seemed a good time to talk about how the proportions of colors used can dramatically affect the overall image of the quilt.

When you look at a palette of colors you might say to yourself that you do not like it because there’s too much of this color and not enough of that. But keep in mind that you’re seeing equal amounts of each color. And how your quilt appears will depend on the amount of each color that you use. So I decided to illustrate this with one of my designs, a long time favorite, Night and Day.


I created Night and Day several years ago and it is a perfect design to experiment with. The original design was based two different of sets of strips with seven fabrics in each set. The colors shaded within each set from light to dark. I wanted to use more fabrics for the Rainbow’s End version so I created four different strip sets shading from light to dark instead of two as in the original. This new version has 28 of the 35 fabrics in the complete Rainbow’s End Grand Bundle.


The idea of a Day and a Night quilt came about after cutting identical triangles from each strip set. The leftover triangles didn’t get used. The triangles cut from one side of the strip set had larger pieces of the lighter fabrics than those cut from the other side which had more of the darker fabrics. So from just these four strip sets, I created one quilt with the lighter triangles and a second one with the leftover darker ones.


I deliberately put a light background on Day  and a dark one on Night, as shown above, but look how different the quilts look where I swap borders and background.


To make these quilts, you will need either the 1/2 yard or full yard bundle. Next time I will show you more background possibilities and I will also have the new revised Night and Day pattern ready for you to download.

Posted on 6 Comments

Our New Grand Bundle – Rainbow’s End

Periodically for the last few years I have put together “Grand Bundles” of fabrics,  the colors of which are inspired by a beautiful photograph from nature. I am always on the lookout for a photo opportunity to use for these bundles. The best creator of colors for a palette is Mother Nature. I am always amazed when looking at a beautiful photo how different the colors are when you actually break down the photo. Nature forces us to add colors we never would’ve thought of adding. These make all the difference in the world.

A couple of weeks ago my daughter and her family were visiting and I put the children on a mission of looking for photo opportunities for the next grand bundle. One day my 10-year-old granddaughter came running into the house yelling,

“Grandma, Grandma, I have your photo.  Get your camera and hurry.” I went running after her and there, seeming to come right out from my own backyard, was a beautiful rainbow. I thought that was a perfect palette for the next bundle. We tend to think of rainbow colors as bold and brilliant and I was surprised to see the soft shades emerge as I extracted the colors.  I decided that batik prints would be perfect for this Grand Bundle.

Below the photo are the colors that were extracted using Photoshop (see this blog for how to get the colors in Photoshop) and here are the batiks that I chose to go with those colors.


There are 35 different fabrics in the Rainbow’s End Grand Bundle and we will be offering them to you as part of our web special program over the next five months. On the fourth week of each month we will offer seven of the Grand Bundle fabrics in “mini-bundles.” Collect them all and you will have a beautiful color palette to use for any of your favorite scrappy projects.


A color palette with this many fabrics makes a perfect scrap quilt such as the ones I showed you with previous Grand Bundles, Thousand Pyramids and Baby Blocks with the Irish Heather bundle and the simple squares with the Protea bundle. Here is a mock-up of what the Thousand Pyramids would look like with the Rainbow’s End bundle.

This color palette would be a perfect use for one of those patterns but I am also presenting a new one for you to experiment with.  Stay tuned for next month when this popular quilt design, done in Rainbow’s End colors, is revealed and start collecting your first mini-bundle now.

Posted on 7 Comments

Protea Blog…Take Two!

Last month on my blog I posted about the Protea Squares quilt made with the entire Protea Bundle. One of the questions asked by a customer about the larger version of the quilt was, what would happen if you put the dark squares in the center instead of the light.  Well, we thought it would be fun to see as well.

Here are both versions without borders.


It is clear that they are quite different. As you saw last time, the border that is added to the quilt can also make a difference. With each of the Protea web special mini-bundles we also offer one or two border print coordinates. These look good with the individual mini-bundles as well as the complete grand bundle. We selected these two Rajasthan borders for this month’s bundle.


I opted for a different treatment of the borders this time and added my more typical border of the narrow and wider border print strips and another fabric in between the two. To determine the width of the middle black border, I once again went to my Golden Gauge Calipers.  The wide border stripe is 5” so I put the calipers across the five-inch strip and that told me that the black fabric should be 3” wide. (5 x .618 = 3”).


You can see here the same border design and the same border treatment with only the color change in the border print. What a different impact the two present.


Posted on 4 Comments

Necessary Neutrals

When I gave my very first talk on color many years ago, I mentioned that I had a “secret ingredient” that seemed  to work with almost every color scheme I put together. That ingredient was brown. As the years went on I soon realized that it wasn’t just brown but any neutral. Grayed down colors…..browns, grays, khakis, dirty blues, etc. Those are the types of colors we tend to overlook when browsing a quilt shop. We tend to gravitate to the brights, pretty colors and others that grab our eyes.

Yet when planning a color scheme neutrals are one of the most important ingredients. I illustrate my point with the images shown here.

The first one above is a photograph of an Iris that was blooming in my yard one May. When we look at that we just see all the beautiful colors and don’t realize how many neutrals are there.


But look what happens when the bulk of the neutrals are removed. Something is lost.


Many years ago I designed the quilt Mayflowers for use with the colors I found in the iris. Look at these two images side by side. The first is with the neutrals included in the color scheme and the second is without the neutrals. By far my favorite is the one with the neutrals included.  The colors in the second one seem too bold and are lacking the rest that the neutrals seem to give our eyes.


So next time you’re designing a quilt or wandering through a quilt shop, don’t forget the neutrals, that secret ingredient.