Posted on 6 Comments

Charm Quilts Part III


This series of posts on Charm Quilts has generated a lot of interest, comments and questions. We welcome those comments and love to hear what you are working on. For this post we will show more options for creating a charm quilt using squares.

For all my quilts, I like to create a “unit” that repeats over and over to make the entire quilt. Within that unit the shapes are arranged by value, then each unit follows the same “formula.” I make stacks of those units until there are enough for the quilt top.

So perhaps after gathering a lot of fabrics and cutting the shapes the next step is to organize the pieces by value. Your unit may have light and dark values or it might have light, medium and dark values.

This unit is made up of 25 squares. It is a Nancy Cabot design called Building Blocks and I found it in the Jan, 15, 1938 issue of the Chicago Tribune.


In the December 2021 newsletter we featured a Charm quilt made by Kay Sorensen. The 25 square unit is shown here. Four of those are pinwheeled and made into a larger unit and then those repeat for the quilt.


The Irish Chain design has many different variations. This one, called Double Irish Chain is a Laura Wheeler design that I found in the Aug. 6, 1933 issue of the Cincinnati Enquirer.

This is made up of units of 36 squares each. Then those, as in the quilt above are also pinwheeled to get the design.


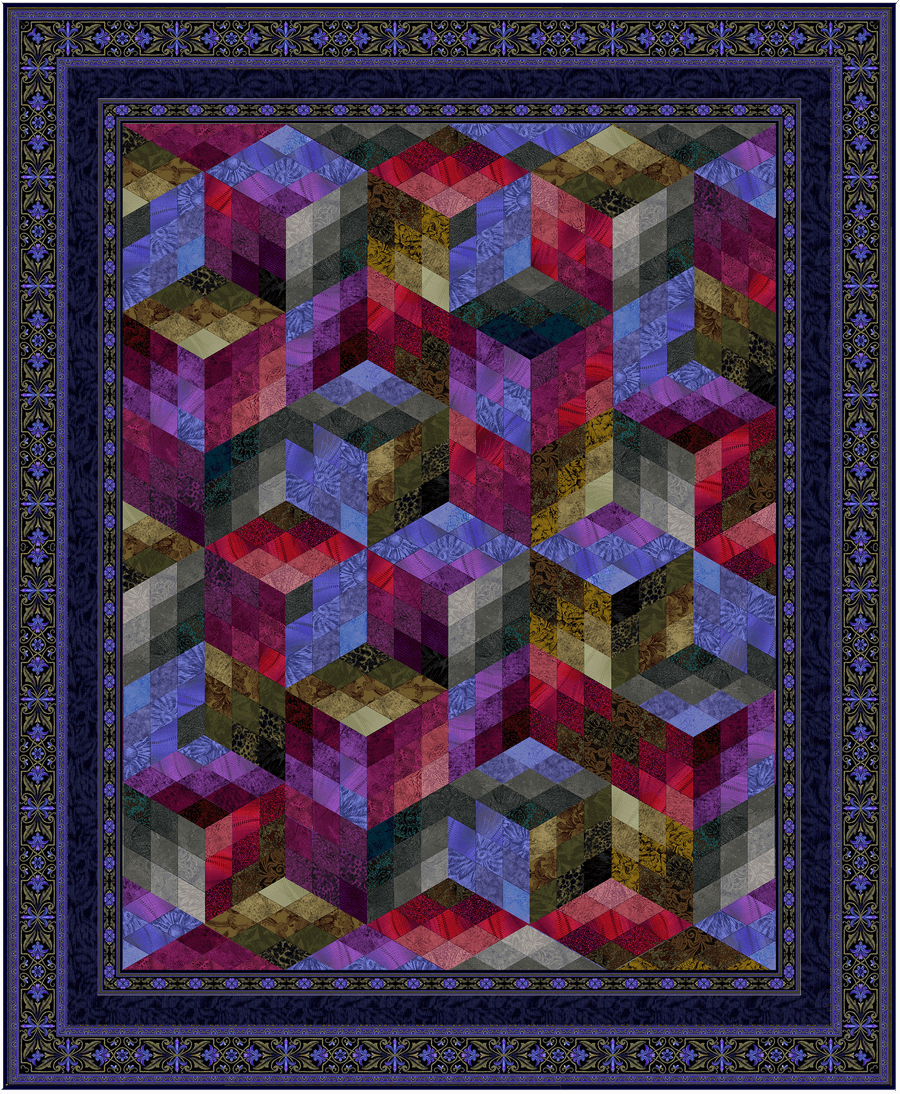
One of my favorite scrap quilts is this one made entirely of small one inch squares. A portion of this quilt is shown at the beginning of this blog. While this is not a charm quilt with all the squares different, it does have a lot of different fabrics and it would be fun to accept the challenge of making all the squares all different for a true charm quilt. The quilt contains 49 of the units explained below and with 81 squares per unit, that makes 3,969 squares in the quilt. The full unit is shown here, but if I were making this, I would break it down into three separate 9-patch units.


Unit 1: Nine squares with three lights diagonally across the middle, four required for the larger unit.

Unit 2: Center 9-patch square with five lights and four mediums, one required for each unit.

Unit 3: Nine square with all medium and dark fabrics sewn together randomly

Then these units could be arranged for the larger square.

There are hundreds of ways squares can be organized to create an interesting design. Why not try your own?

See this months’ newsletter and the two previous blog posts for even more ideas for working with squares to create a charm quilt.

Posted on 3 Comments

Charm Quilts Part II

We have had a lot of interest in the last blog post about Charm Quilts. In general a charm quilt, made with one shape, is where each piece is cut from a different fabric. However in my research I have seen ones where all the different patches are alternated with a common fabric. I still call that a charm quilt.


Here was an interesting question from one of our readers, Nancy B.

“Jinny, must every square be different for it to be called “charm”? I ask because I have been making 5 “ squares of 5 rows of 5 one inch squares for several years and think of it as a “journal quilt”. I had read about the idea of using small scraps from each quilt as I made it and then assembling them into a larger quilt as a kind of way to keep a “journal” of the quilts I as I made them. But although I have 100s, some of the small squares repeat twice within a block to create a kind of symmetry around the center square or the opposite corners. I am sure to have over a 1000 fabrics used in total but some squares are duplicates. Shall I call it a Journal Quilt or is it a kind of Charm Quilt? Thanks for your opinion!”

Your quilt sounds like it is quite a journey. I love the idea and I love your name of “Journal Quilt”. But if a lot of pieces are duplicated I probably wouldn’t call it a charm quilt. That said, sometimes I have found that there is one piece in the quilt that has been duplicated, perhaps by design. I often wondered about that until I heard the following story. Someone who inherited a Charm Quilt that her grandmother made, told about having that quilt on her bed during a long childhood illness. She said, “I finally found the two patches alike, a game we used to play as children.”

I have an antique charm quilt made with triangles (shown above). There are 16 block units that make up the quilt. When I first saw this I figured that it was not a charm quilt because I quickly realized that the triangles in the center of each unit were yellow and red, and most of them were cut from the same fabrics. Also the corner triangles of each of each block also had repeats. Two opposite corners were always green and the other two corners were either yellow or red. On closer examination, I discovered that those center and corner triangles were the only fabrics that were used multiple times. All the other pieces in the quilt (except for the border fabrics) were cut from different fabrics. There was a lot of planning that went into this quilt. I still call it a charm quilt because it was obviously the intention of the maker to create a quilt where the red and yellow centers of the blocks and the corner pieces were the “unifiers” of all of the different fabrics.

In each of the 16 blocks in the quilt, there are 32 triangles for a total of 512 triangles. However, 384 triangles are cut from different fabrics. I call this a charm quilt because it appears it was the intension of the maker to showcase all of those different fabrics. One of the block units is shown in the image below.


I must say, that in the charm quilt I made, I have a piece that was duplicated. It was not my intention to have those two pieces from the same fabric, but with so many different pieces it is hard to not repeat one. I only made the discovery after the quilt was finished. My niece and nephew who were five and seven at the time were staying with me for a few days and it was raining and they were bored. I spread out my charm quilt and told them to see if there were any pieces that were duplicated. It did not take them longer than a half an hour to find two pieces the same. I still call it a charm quilt even though inadvertently I used one fabric twice.

In my next blog post, which will come out in early December, I will show you some other ways simple squares can be put together to create interesting quilts. I will also give you some other shapes to download in case you want to create a quilt with a shape other than a square.

Posted on 9 Comments

Scrappy Quilts with Traditional Style Blocks

Growing up, we had a scrap bag. While I didn’t start quilting until I was an adult, as a child I was always sewing something. My sisters and I made a lot of our own clothes and there were always leftover pieces. I would look through the scraps searching for the right piece for various projects, including doll clothes, which I made by the dozens.

So naturally when I began my first quilt I automatically went to my scrap bag. I was living in India at the time and had fallen in love with the Indian hand-block printed fabrics. I had made clothes, bags and other items as gifts and for my own use and all the scraps went into the scrap bag. My first quilt, begun in 1972, was a Grandmother’s Flower Garden made with fabrics from that bag. Although I have to admit I made a few trips to the marketplace to purchase a few more fabrics for my quilt.

I “organized” the scraps so that I would use the same fabric in individual flowers, but then each flower would be put together differently. There were a few repeats.


From that point on, I have loved making quilts with lots of different fabrics. To me, the more fabrics the better.

I often am asked, “I understand how to use lots of different fabrics in quilts such as Baby Blocks or Thousand Pyramids, but how do you do it with block style quilts?”

First and foremost, you have to select a block design, shade it in grey scale, and determine where you want the lightest, mediums, darks and darkest tones.  I will illustrate with the block used in my quilt pattern Desert Star but the same process is used for all of my designs.

Here are two different ways you might choose to shade in the block, Desert Star.


Version A


Version B


I selected version A and then decided how many different value groups to have in the quilt. You can see here that I have six different values. Number 1 is  the lightest fabric. Fabrics 2 through 4 are light to dark with light in the center. Number 2 is not as light as the background fabric, number 1. Fabric 6 is a medium value and could be similar in value to fabric 3.


Once you have the block design and have decided on value placement within the block, the next step is to select a palette of colors. If you are at a loss for colors that look good together you might want to select one of our shaded bundles to start with. To get as many fabrics as possible, fill in with colors from your stash that fall within the same general color range as those in the bundle.

Next sort the fabrics into color groups. Here are the color groups I used when I made the quilt from the Sonoran Spring bundle:


Group 1, lightest fabrics for background


Group 2, star points light


Group 3, star points medium


Group 4, star points dark


Group 5, darkest fabrics for small triangles


Group 6, medium blues/blue grey for large corner triangles


Here are four different blocks made up of those color groups.  It is fun to see how many different blocks you can make using the same “formula.” Since this is a digital image, I have only used the four different blocks in the quilt shown here, but if I were making the actual quilt, I would follow the same formula. Keep in mind that you don’t have to be strict with the colors. For instance, depending on the other fabrics used, a fabric used as a dark star point in one block might be a medium point in another block. Just have fun and relax!


Stay tuned for another blog on how to incorporate border print fabrics in this design.

Posted on 30 Comments

Getting to Know Jinny Beyer

I have been very lucky to have been quilting, teaching, writing books and designing fabrics for quilters for more than forty years. This past year, while there have been many things I haven’t been able to do, the Studio continues to operate, as an internet only business.

One positive we have found in the past several months is an influx of new quilters and others who have just “found” us. We welcome you all!

Since many of you are not familiar with me and my work, we have decided to add a feature to our newsletter called “Get to know Jinny Beyer” and each month I will answer a question you may have about me or my work.

One question I get asked all the time is “How did you get into fabric designing?” My answer has always been that I got in through the back door, not the front.

I have been sewing all my life and lived for several years in Malaysia, Nepal and India where I collected batiks and hand block printed fabrics. I began quilting while living in India and used scraps from all my sewing projects for quilts. Of course, I had to buy more specifically for quilts!


Jinny’s first quilt made with Indian hand block printed cottons, Grandmother’s Flower Garden


Upon returning to the States in the early 1970’s I was very disappointed in the fabrics that were available….mostly cutesy calico prints done in primary colors. After a few years of disappointment in what was available I decided that maybe I could tell fabric companies what kinds of fabrics quilters would like. I took it upon myself to put together a portfolio of prints and colors that I liked and how I would change them and made appointments with three different fabric companies. I took the train to New York full of optimism and came back home full of disappointment. At each place I got basically the same questions and the same treatment before they even looked at my portfolio. “Where did you go to design school?” “Were you a textile major in undergraduate school ?” “Have you studied color and color theory?” and on and on. I had never had that kind of an education. I had a master’s degree in special education.  I felt like a little kid getting a pat on the top of my head as I left through the front door of each place.

I decided fabric designing was not in the cards for me.


Ray of Light


Then out of the blue one day in the late 70’s, I received a phone call from Nancy Puentes and Karey Bresenhan, the founders of the International Quilt Market. By this time my quilt, Ray of Light, had won the Good Housekeeping Magazine’s “Great American Quilt Contest” and my name was becoming known by quilters outside my own area.

Nancy and Karey were concerned that independent quilt stores were struggling to stay in business because they were competing with large fabric chain stores who could buy the fabric in bulk for better prices and offer them at a discount.

They had approached VIP, a New York basked fabric manufacturer, and asked if they would be willing to create a line of fabric that would not be sold to chain stores and that was exclusive to independent fabric retailers. They felt a quilter’s name should be associated with the collection and thought of me. Thus, their phone call.

I worked with VIP for three years, but in the early 1980’s they decided that quilting had reached its peak and they were going to get out before the interest waned and they dropped my line. That is when RJR contacted me and the rest is history. I have been working with them ever since.

My textile education has been learned through being immersed in the actual designing and creating for more than 40 years. I have yet to take a design or color course. As I like to say, “I got in through the back door, not the front.”

Posted on 5 Comments

Selecting and Placing colors and fabrics for scrap type quilts, Part 2 Assembling the Quilt

In my last post, I discussed my Day Lilies quilt and how to plan fabric and color schemes for this and any “scrappy” quilt. Today, I’m continuing that discussion.


Step 1.

For any scrappy quilt, I think it would be impossible to try and plan the placement of every piece in advance. I like to work in units, making sure that the balance of color and fabric placement within each unit is satisfying to me.

For Day Lilies, my unit was one petal. I made stacks of brown, red and purple petals, using a wide variety of different fabrics.


Depending on your pattern, you may have just random placement of dark, medium and light within the units such as is done with Thousand Pyramids.


Or you may have colors shaded light to dark within each unit such as Day Lilies above or Urban Sunset shown here.


When working with shaded units, I have a little trick to make easily get several different units. Lay out a group of fabrics in a “run,” light to dark. Here I have such a run which I might use for Day Lilies. There are 11 fabrics.


I only need seven fabrics for a Day Lilies petal so I could make one unit using in order fabrics 1-7, for another petal I could use 2-8, then 3-9 and so forth. This will yield five different petals. Continue doing this with different runs of shaded colors.

For Urban Sunset, some of the nine-diamond units are shaded light to dark lengthwise and some are shaded light to dark sideways as seen above.

For these units, I did the same thing as shown above on Day Lilies. I arranged several “runs” of fabrics such as this one which contains nine fabrics shaded light to dark.


Since only five fabrics are needed for each unit in this quilt, there are five possible units that can be made shading them lengthwise and five sideways for a total of 10 different units. The lengthwise shaded ones are shown here.


When I find a unit with colors that I like, I will make at least two of the same colors. They will be used in different parts of the quilt so that the same units are not adjacent to each other. The Urban Sunset Pattern shows how the smaller units are formed into the increasingly larger units.

Once I have a good amount of what I call the “base” units, I will start arranging them into larger units. For Day Lilies, it is the large flowers by color – purple, red and brown.


For Urban Sunset, it is the larger units that are built according to the directions in the pattern.


For Thousand Pyramids you will make two sets of units one with the dark triangles at the bottom and one with the light triangles at the bottom. These are then alternated in the layout of the units.


After the larger units are sewn together then is when I finally like to lay them all out on either a design wall or the floor and arrange them to my liking. You will find that if you are satisfied with the base units and then the larger units, you will be pleased with the overall arrangement.

I find that if all the pieces of the quilt are decided upon in advance, it does not allow for the quilt to “speak” to you. Some of the spontaneity is lost and for me part of the pleasure of making a scrappy quilt with lots of fabrics is the discovery along the way.

Posted on 14 Comments

Celebrate National Poinsettia Day

One of my favorite things to do is to find a beautiful Image, extract the colors from the image and then find fabrics to go with those colors. It’s a great way to experiment with color and to select a beautiful palette for a new project. So, in honor of National Poinsettia Day on December 12, I worked with a photo taken at a local business, Merrifield Garden Center, by one of our staffers, Nancy, and created a bundle of fabric that is also this week’s web special.


In addition to the fabrics, I wanted to give you a suggestion for a project which uses these fabrics. I’ve chosen the block, Triangle Charm, from our Quilters Block Library . This is a free pattern which can be downloaded in a 6, 10 or 12-inch block. I selected a 10-inch block. This allows you to easily cut the triangles from 3-inch strips.


A half yard bundle will give you plenty of fabrics to make sixteen 10 or 12–inch blocks with leftovers for other projects. You will need additional fabrics for your choice of border.

The block is an easy one made with a simple right triangle. The final outcome of the design is reflected in the amount of each color used. The secret is in the shading and there are a variety of ways to shade it. For this blog, I have chosen two variations. Block 1 has more darks with the lights giving the sparkle and Block 2 has the color shading reversed so there are more lights in the quilt. Both have exactly the same fabrics from our Poinsettia bundle.


Block one and block two


Select the block you prefer then layout and arrange one block to use as a fabric placement reference for the remaining ones.

In the layout I have used, half of the blocks are made one way and the other half are reversed. Block 1 is used here.


First, four of the regular blocks are pinwheeled. Make two of these regular pinwheel units.


The reverse blocks are also pinwheeled as shown below. Make two of these.


Arrange the regular and reverse pinwheel units as follows:


In past blogs I have talked about proportions of color and how different a quilt can look depending on how much of each color is used.  The color impact of this same design, using block 2, which contains more light colors is quite striking.


Quilt made with block one and quilt made with block two


To me, adding a border to a quilt, is like putting a frame on a painting. It finishes off the design. Like paintings, some quilts do not call for a final “frame” but for the most part, I like to add some sort of border, usually a “border print”. Click here to see a video demonstration of how to put a border print frame on a quilt and achieve perfectly mitered corners.

Here are four different border print frames. Two yards is sufficient if using the 10” version of the block. Some borders suit the darker version of the quilt and some the lighter version.


Casablanca red border, 2795-04


Casablanca brown border, 2795-02


Sophia border, 1280-05


Ashford border, 1695-41


I hope you enjoy playing with these fabrics.  Let us know what you choose to do with them.

Posted on 14 Comments

Quilters’ Quest 2019 is Right Around the Corner!

This is a very busy time for us at the Studio. We are in the middle of our retail shop anniversary sale which is followed soon after by our annual shop hop, Quilters’ Quest, from October 11th through the 20th.

The theme for this year’s shop hop is books. Each shop has chosen a favorite book and will use that particular book to decorate the shop. We’ll have special related items available for the people who take part in the Quest.

Our Quest colors are traditional ones reminiscent of a long-established library that fit the “book” theme. Each shop has put together a pack of six 10” squares using those colors. All of the shop owners got together and traded fabric squares and then created a quilt using those fabrics. Many shops have finishing kits to help you in making their quilt. You will collect a free pattern for each shop’s quilt as you travel the Quest, then have fun deciding on which quilt you would like to make!


I wanted our quilt to fit the book theme. I tried a variety of designs that all seemed too complex, then one of my staffers suggested a design like my quilt Inner City which she thought looked like books. I took the idea, elongated the pieces and created my new version calling it Open Book.


Inner City


Don’t panic! While the design looks involved with lots of angles, it is actually very easy to sew with all straight line sewing.

All the shop owners agreed that our fabrics would be in the mid-range with no super lights and no very darks. That way each shop could add what they wanted to fit their design. The first thing I did was to sort the fabrics into groups – very dark, dark, medium, and light. I added a few fabrics in the very dark and light ranges. The lightest fabrics would be the pages of the books, the others the book covers.


Then the fun started. I found C See’s 18” portable design mat invaluable as I laid out the pieces one section at a time. Then I could roll it up and the pieces would stay in place until I was ready to sew. The pattern writer, Elaine Kelly, did a masterful job in breaking the design down into easy assembly instructions.


Once the inside was complete I had to decide on a border for the quilt. Such a bold design needed a strong border. I opted to set the center off by adding a border of two stripes from my mini-stripe fabric, followed by the wide stripe of the Casablanca border print.

The finished top is 52” x 56”. I am now in the middle of hand quilting it and I hope to have all the quilting complete by the time Quest starts.


I continue to quilt on Open Book each evening.


It was such fun creating Open Book but I had lot of leftover pieces that were already cut and waiting to be sewn. I also had the narrow stripe from the Casablanca border and leftover mini stripe. So, I decided to make a “bonus” quilt from the extra pieces. The result of that is Stacks. One complete set of swatches collected from each shop and our finishing kit will make both quilts.


The Quest is fast approaching. I hope you will be able to join us.

Posted on 5 Comments

Proportions of Color

With the second mini-bundle of our Rainbow’s End Grand Bundle coming out this week as part of our web special, it seemed a good time to talk about how the proportions of colors used can dramatically affect the overall image of the quilt.

When you look at a palette of colors you might say to yourself that you do not like it because there’s too much of this color and not enough of that. But keep in mind that you’re seeing equal amounts of each color. And how your quilt appears will depend on the amount of each color that you use. So I decided to illustrate this with one of my designs, a long time favorite, Night and Day.


I created Night and Day several years ago and it is a perfect design to experiment with. The original design was based two different of sets of strips with seven fabrics in each set. The colors shaded within each set from light to dark. I wanted to use more fabrics for the Rainbow’s End version so I created four different strip sets shading from light to dark instead of two as in the original. This new version has 28 of the 35 fabrics in the complete Rainbow’s End Grand Bundle.


The idea of a Day and a Night quilt came about after cutting identical triangles from each strip set. The leftover triangles didn’t get used. The triangles cut from one side of the strip set had larger pieces of the lighter fabrics than those cut from the other side which had more of the darker fabrics. So from just these four strip sets, I created one quilt with the lighter triangles and a second one with the leftover darker ones.


I deliberately put a light background on Day  and a dark one on Night, as shown above, but look how different the quilts look where I swap borders and background.


To make these quilts, you will need either the 1/2 yard or full yard bundle. Next time I will show you more background possibilities and I will also have the new revised Night and Day pattern ready for you to download.

Posted on 6 Comments

Our New Grand Bundle – Rainbow’s End

Periodically for the last few years I have put together “Grand Bundles” of fabrics,  the colors of which are inspired by a beautiful photograph from nature. I am always on the lookout for a photo opportunity to use for these bundles. The best creator of colors for a palette is Mother Nature. I am always amazed when looking at a beautiful photo how different the colors are when you actually break down the photo. Nature forces us to add colors we never would’ve thought of adding. These make all the difference in the world.

A couple of weeks ago my daughter and her family were visiting and I put the children on a mission of looking for photo opportunities for the next grand bundle. One day my 10-year-old granddaughter came running into the house yelling,

“Grandma, Grandma, I have your photo.  Get your camera and hurry.” I went running after her and there, seeming to come right out from my own backyard, was a beautiful rainbow. I thought that was a perfect palette for the next bundle. We tend to think of rainbow colors as bold and brilliant and I was surprised to see the soft shades emerge as I extracted the colors.  I decided that batik prints would be perfect for this Grand Bundle.

Below the photo are the colors that were extracted using Photoshop (see this blog for how to get the colors in Photoshop) and here are the batiks that I chose to go with those colors.


There are 35 different fabrics in the Rainbow’s End Grand Bundle and we will be offering them to you as part of our web special program over the next five months. On the fourth week of each month we will offer seven of the Grand Bundle fabrics in “mini-bundles.” Collect them all and you will have a beautiful color palette to use for any of your favorite scrappy projects.


A color palette with this many fabrics makes a perfect scrap quilt such as the ones I showed you with previous Grand Bundles, Thousand Pyramids and Baby Blocks with the Irish Heather bundle and the simple squares with the Protea bundle. Here is a mock-up of what the Thousand Pyramids would look like with the Rainbow’s End bundle.

This color palette would be a perfect use for one of those patterns but I am also presenting a new one for you to experiment with.  Stay tuned for next month when this popular quilt design, done in Rainbow’s End colors, is revealed and start collecting your first mini-bundle now.

Posted on 3 Comments

Are You Ready for Row by Row 2019?

As we were getting ready to post this new blog entry, some of us received by email a blog entry from last year.  It seems to have been floating around in cyberspace since then.  We apologize for any confusion.  Please ignore it but pay attention to the new entry below.

Row by Row begins this week!

We have been super busy preparing for the Row by Row Shop Hop. For those of you not familiar with the program, it is a worldwide shop hop. Each participating shop designs a panel for a quilt or a stand-alone mini quilt and creates a pattern for their row. You can travel to any of the participating shops and receive the free pattern for that shop’s “row” and most shops have kits available. Make a quilt from the patterns you collect. If it contains at least eight official rows, take it to a participating shop. If you are the first person to bring a finished quilt to that shop, you will receive 25 fat quarters of fabric. If your quilt contains the row from that shop, you will receive an additional prize.


Luke is waiting patiently there in the lower right corner for the crumbs to fall.


The theme this year is “Taste the Experience” and the designs are created to fit that theme. This year for fun, the shops who are all part of the Quilters’ Quest shop hop in October decided to get together and plan a coordinated quilt for the Row by Row shop hop. We decided to make each of our rows like a vintage diner sign. Since I am known for growing hot peppers and for my hot pepper jam recipe, our row shows the jam and the peppers. When you pick up your free pattern you will also receive the recipe for my hot pepper jam.

In order to simplify sewing all those letters, we created a printed panel for the sign and for the “hot” label. This makes creating the row so much easier!

We are also participating in the Row by Row Junior and have a free pattern for “Jelly” the jellyfish for any child who comes into the shop. Kits are also available for purchase.


Go to the Row by Row website to read all the rules and to find participating shops by state and country.


Since I know that many of you cannot travel to the Studio, I didn’t want  those of you who live far away to feel left out. In keeping with the spirit of the event and theme, I designed a tessellating pattern for both a lap size and mini size quilt which I call “Forklift.” Since these are not officially part of Row by Row, we have patterns and kits available online and in the Studio.


Plus, in addition to the Forklift quilts, we also have our “Palette Pleaser” fabric license plates. So, no matter where you are we hope you’ll be able to take part in Row by Row not only at your local shops but with the Studio, too.