Posted on 41 Comments

A Message from Ukraine

Quilt by Olga Kozitskaya


(All photos courtesy of Sign Maksym Kapusta)

As I watch the terrifying events taking place in Ukraine, I can’t help but be devastated by all that is happening in that beautiful country. I have gone to Kyiv several times through the years to teach and was always impressed with the talent of the quilters in my classes. I worry about their safety and think of the many friends I have made there through the years.

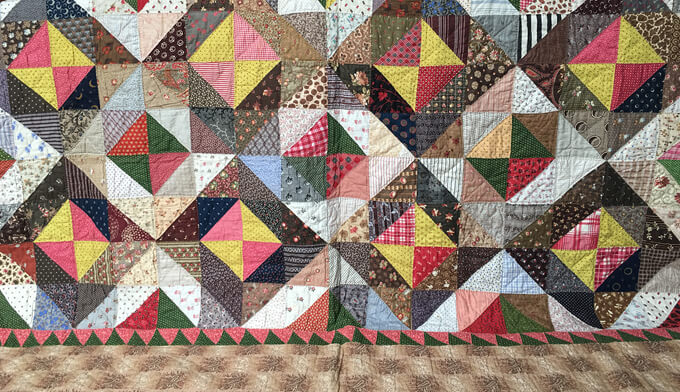
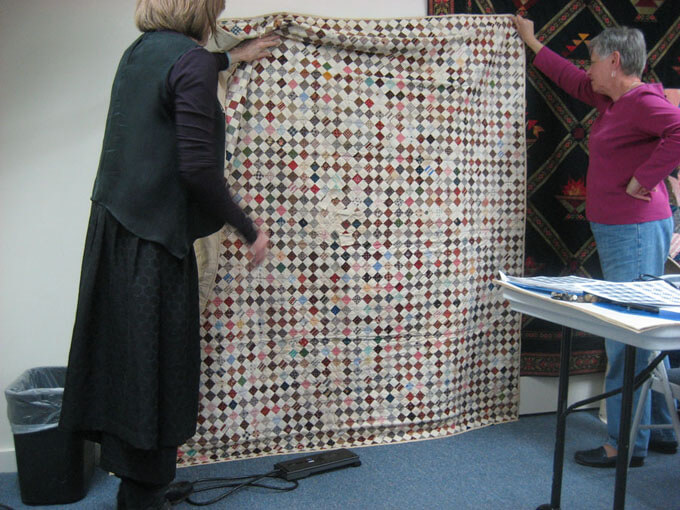
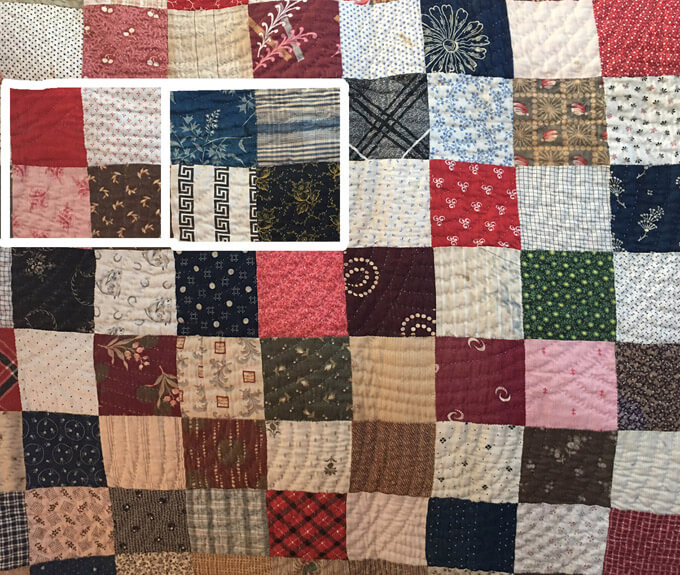
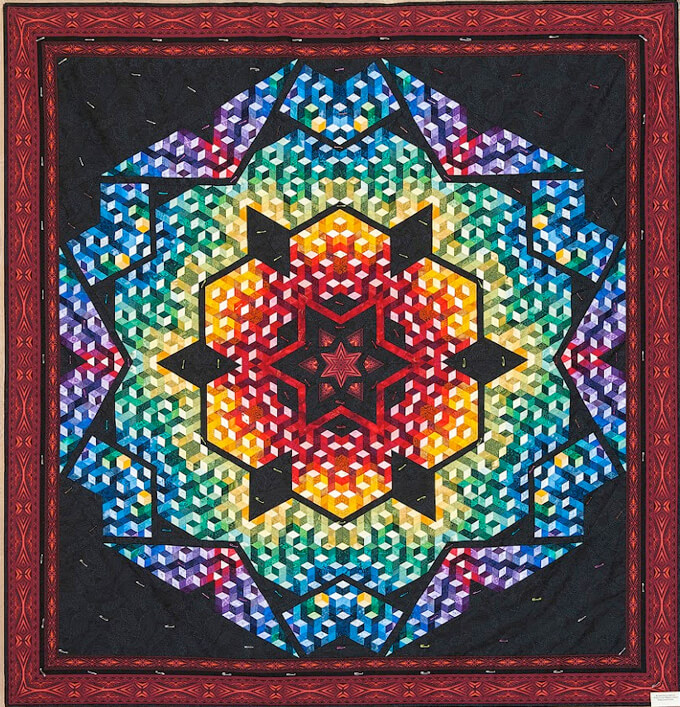
I want to share part of a message from one of my Ukrainian friends, Lena, along with pictures Lena’s husband took of the amazing quilts she and her fellow quilters have made so that you can have a connection to those students as well. In Lena’s message, she speaks of thanks for the concern we have for her country and of her fellow quilters who I got to know on my visits there and then describes her life now.


Макаревич Мария. “Калейдоскоп 2012”                                                                                                                                                  Maria M. Kaleidoscope 2012


It seems that of everyone you could know in Kyiv, I was left alone…some went to Lviv and some to other Western parts of the country. My family did not have such an opportunity and we were forced to stay in the very heart of Kyiv, me and my husband Maxim. My mother also remained in Kyiv, but to my great regret, we are separated from her by the Dnieper River, and the bridges are closed for the duration of the war.


Королева Елена. Калейдоскоп-кристалл “Радуга над Манхэттэном”. Lena K. Queen Helena. Kaleidoscope-crystal “Rainbow over Manhattan”. Dedicated to Jinny Beyer


So far, everything is fine with me, there are still a lot of food supplies, there will be enough medicines for several months. I’m at home, dressed to go out, waiting for the bombing. We don’t have a basement or a bomb shelter here. There is a nearby Fairmont hotel with underground parking. And there is a metro station within a five-minute walk, but it is not deep. In addition, the sirens warning of the bombing stopped working.


Этим квилтом я начинаю рассказ о нашей новой выставке. Перед вами работа Янчуковской Нины Михайловны Калейдоскоп “Восток”                                                                                                                                                            Here is the work of Nina Mikhailovna Y, Kaleidoscope “East”


We very much feel the support of the whole world, including the Americans, and this warms our souls.

You won’t believe it, but when I think that a bomb might hit my house, I don’t think it will kill me, but what will happen to my supply of fabrics and my quilts. I am especially worried about the quilt that I dedicated to you.

Lena


Матиенко Тамара. Калейдоскоп “Цветок Лотоса”                                                                                                                      Matienko Tamara. Kaleidoscope “Lotus Flower”


To many, it would seem silly to worry about your quilts and fabric at time like this but many a quilter would understand how Lena feels about the possibility of leaving it all behind. Our hearts and souls have been stitched into those quilts which contain fabrics that we collected along the way…another part of the journey.

Posted on 22 Comments

Charm Quilts Part IV

For the last few months, I have been sharing with you some of the quilts from my antique charm quilt collection. I have told you that one of the easiest ways to work with them is to create a unit and then use the same value placement in each block. But many quiltmakers experimented with other layouts of the pieces in ways to showcase each of the different fabrics. The quilt at the beginning of this newsletter is one example.

Quite a few of my charm quilts have radiating rings going from the center outwards. The right triangle in last month’s quilt can be used for these radiation ring designs as well. In this first one, it appears that the maker separated the pieces into lights and darks and then, depending on how many of the two groups there were, added the pieces one row at a time. The first ring is dark, then one ring of light, three of dark, one of light, two of dark and so on.


The maker of the second quilt has not only organized the pieces by light and dark but by color as well. Single rows of lights and darks have been alternated but the rings follow a color pattern as well. I like the way the red pieces in the center balance with the red ring further out. The same holds true with the dark blues.


An equilateral triangle has been used for the radiating rings in this next quilt. The rings are alternated lights and darks. The lightest fabrics are used in the center ring with the fabrics in each successive “light” ring being darker.


I love to look at the individual fabrics in a charm quilt and see what the maker had in mind. In this particular quilt, there are some very interesting fabrics that have been used. One of them is a “cheater” panel that was printed in the 1850’s. I don’t know if all of the cat and dog motifs in this quilt are from the same panel or more than one. But the maker felt because there were different motifs, it could be part of the “charm.” The other fabrics seem to indicate that this quilt was completed in the 1880s.


In this fourth quilt, the charm pieces are hexagon fabrics. Once again, the fabrics were sorted into lights and darks and then by color. The maker had very few green fabrics and I like the way they were arranged in the fourth ring from the center. Likewise, all the pink fabrics form one of the rings. Of particular interest to me is that there are a lot of striped fabrics in the quilt. A close examination shows that all of those fabrics have the stripes oriented in the same direction.


Which of these do you like best?

Posted on 6 Comments

Charm Quilts Part III


This series of posts on Charm Quilts has generated a lot of interest, comments and questions. We welcome those comments and love to hear what you are working on. For this post we will show more options for creating a charm quilt using squares.

For all my quilts, I like to create a “unit” that repeats over and over to make the entire quilt. Within that unit the shapes are arranged by value, then each unit follows the same “formula.” I make stacks of those units until there are enough for the quilt top.

So perhaps after gathering a lot of fabrics and cutting the shapes the next step is to organize the pieces by value. Your unit may have light and dark values or it might have light, medium and dark values.

This unit is made up of 25 squares. It is a Nancy Cabot design called Building Blocks and I found it in the Jan, 15, 1938 issue of the Chicago Tribune.


In the December 2021 newsletter we featured a Charm quilt made by Kay Sorensen. The 25 square unit is shown here. Four of those are pinwheeled and made into a larger unit and then those repeat for the quilt.


The Irish Chain design has many different variations. This one, called Double Irish Chain is a Laura Wheeler design that I found in the Aug. 6, 1933 issue of the Cincinnati Enquirer.

This is made up of units of 36 squares each. Then those, as in the quilt above are also pinwheeled to get the design.


One of my favorite scrap quilts is this one made entirely of small one inch squares. A portion of this quilt is shown at the beginning of this blog. While this is not a charm quilt with all the squares different, it does have a lot of different fabrics and it would be fun to accept the challenge of making all the squares all different for a true charm quilt. The quilt contains 49 of the units explained below and with 81 squares per unit, that makes 3,969 squares in the quilt. The full unit is shown here, but if I were making this, I would break it down into three separate 9-patch units.


Unit 1: Nine squares with three lights diagonally across the middle, four required for the larger unit.

Unit 2: Center 9-patch square with five lights and four mediums, one required for each unit.

Unit 3: Nine square with all medium and dark fabrics sewn together randomly

Then these units could be arranged for the larger square.

There are hundreds of ways squares can be organized to create an interesting design. Why not try your own?

See this months’ newsletter and the two previous blog posts for even more ideas for working with squares to create a charm quilt.

Posted on 3 Comments

Charm Quilts Part II

We have had a lot of interest in the last blog post about Charm Quilts. In general a charm quilt, made with one shape, is where each piece is cut from a different fabric. However in my research I have seen ones where all the different patches are alternated with a common fabric. I still call that a charm quilt.


Here was an interesting question from one of our readers, Nancy B.

“Jinny, must every square be different for it to be called “charm”? I ask because I have been making 5 “ squares of 5 rows of 5 one inch squares for several years and think of it as a “journal quilt”. I had read about the idea of using small scraps from each quilt as I made it and then assembling them into a larger quilt as a kind of way to keep a “journal” of the quilts I as I made them. But although I have 100s, some of the small squares repeat twice within a block to create a kind of symmetry around the center square or the opposite corners. I am sure to have over a 1000 fabrics used in total but some squares are duplicates. Shall I call it a Journal Quilt or is it a kind of Charm Quilt? Thanks for your opinion!”

Your quilt sounds like it is quite a journey. I love the idea and I love your name of “Journal Quilt”. But if a lot of pieces are duplicated I probably wouldn’t call it a charm quilt. That said, sometimes I have found that there is one piece in the quilt that has been duplicated, perhaps by design. I often wondered about that until I heard the following story. Someone who inherited a Charm Quilt that her grandmother made, told about having that quilt on her bed during a long childhood illness. She said, “I finally found the two patches alike, a game we used to play as children.”

I have an antique charm quilt made with triangles (shown above). There are 16 block units that make up the quilt. When I first saw this I figured that it was not a charm quilt because I quickly realized that the triangles in the center of each unit were yellow and red, and most of them were cut from the same fabrics. Also the corner triangles of each of each block also had repeats. Two opposite corners were always green and the other two corners were either yellow or red. On closer examination, I discovered that those center and corner triangles were the only fabrics that were used multiple times. All the other pieces in the quilt (except for the border fabrics) were cut from different fabrics. There was a lot of planning that went into this quilt. I still call it a charm quilt because it was obviously the intention of the maker to create a quilt where the red and yellow centers of the blocks and the corner pieces were the “unifiers” of all of the different fabrics.

In each of the 16 blocks in the quilt, there are 32 triangles for a total of 512 triangles. However, 384 triangles are cut from different fabrics. I call this a charm quilt because it appears it was the intension of the maker to showcase all of those different fabrics. One of the block units is shown in the image below.


I must say, that in the charm quilt I made, I have a piece that was duplicated. It was not my intention to have those two pieces from the same fabric, but with so many different pieces it is hard to not repeat one. I only made the discovery after the quilt was finished. My niece and nephew who were five and seven at the time were staying with me for a few days and it was raining and they were bored. I spread out my charm quilt and told them to see if there were any pieces that were duplicated. It did not take them longer than a half an hour to find two pieces the same. I still call it a charm quilt even though inadvertently I used one fabric twice.

In my next blog post, which will come out in early December, I will show you some other ways simple squares can be put together to create interesting quilts. I will also give you some other shapes to download in case you want to create a quilt with a shape other than a square.

Posted on 12 Comments

Charm Quilts

So, what is a Charm Quilt?

A charm quilt is a quilt that is usually made with a single shape and where each piece is cut from a different fabric. Squares, rectangles, hexagons, triangles and diamonds are probably the most common shapes used but others can be used as well. This is a fun project to work on in a quilting group, where you can trade fabrics with each other.

In this blog we start off with probably the easiest shape to work with, a square. The squares can be arranged in a variety of different configurations. But the best way to proceed is to have some type of unit. Then just sew units together and in the end the units can be arranged to balance out color.

The quilts shown here have basically the same layout. At first glance the first one, made with 3 ¾” finished size squares, appears to have those squares randomly sewn together. But a closer look shows four patch units with two squares in one block lighter than the other two. Then those squares are sewn together.


You can very clearly see the four patch units in Square Charm Quilt 2. Made with 2 ½” finished size squares, this quilt was very clearly made in four patch units with the lights quite a bit lighter than the darks.


Square Charm Quilt 3 is probably one of my favorite Charm Quilts. It was also constructed with four patch units. This time the printed fabrics were combined with a solid colored light fabric. The 1” finished size pieces are then sewn together. In the very center of the quilt is a patch with the following words, “This quilt contains 1,844 calico pieces, no two alike.” Several notes have been attached with basting stitches to some of the calico pieces. The notes contain the name of a person. My guess is that those particular fabrics came from the person whose name is on the notes.


Now you may be wondering why it is still considered a charm quilt even though all of those background fabrics are the same. You will often find a common background fabric in these quilts acting as a unifying factor. However, all of the other squares are different so it is still considered to be a charm quilt.

By now most of us have large stashes of fabric. Pull out those fabrics and stay tuned for more coming later this month on ways to make charm quilts with a variety of different settings. In the meantime, start collecting your squares or whatever shape you want to use.

Posted on 20 Comments

Windows

Jinny’s Windows quilt, made to honor the victims of the 9/11 attacks.


As we approach the 20th anniversary of 9/11, I want to share with you once again, the quilt I made to commemorate that tragic day. I wanted to honor all those who lost their lives on September 11, 2001. My goal was to have at least one piece for each of the victims. There are 4,777 pieces in the quilt. The one in the center is for my friend, Barbara Olson, who was in the plane that crashed into the Pentagon.

I began the quilt that week of September 11 and hoped to finish it just one year later by September 11, 2002. (I was one month late and finished it on October 11.) It is entirely hand pieced and I used more than 100 different templates and about 150 different fabrics all from collections I have designed over the years. I wanted to capture the spinning and chaos that surrounded those first days and to capture the colors I was seeing in the gray smoke and dust with the occasional, proud American flag standing tall. In the center is the Statue of Liberty which stands in New York Harbor and is repeated surrounding the center along with American flags.


In choosing the colors, I referred to an image I had been using in my color class where I took an image of the American flag, pixelated it and took out the colors using them in my quilt.


I am often asked how did I get the border print to curve? In the free tips section of my web site is a tutorial on how I achieved those curved effects. Here is a link.

And where did the name come from? I knew from the start that I wanted to call it “Windows.” Everyone was looking at windows that day – windows from planes, windows of televisions, people looking out windows from the top of the World Trade Center where sat the famous Windows on the World restaurant.

Probably, though, the most common question I am asked is if there is a pattern for the quilt and a kit available. Obviously with so many templates and fabrics used that would be impossible. Furthermore, it is a very personal quilt to me with lots of memories stitched into it.

Posted on 15 Comments

Thread for Hand Quilting

My first quilt was a grandmother’s flower garden made with Indian hand block printed fabrics. It was done with all dark colors. When it came time to quilt it, I went looking for thread. There were no quilting stores in my area in 1972, only quilting areas in other types of handicraft stores. I went into a predominantly needlework shop and asked for navy blue thread for quilting. I was told in no uncertain terms that you never quilt with colored thread. Quilting is done in only cream or white and if you ever used a different color thread and entered a competition, the quilt would be disqualified. I said I had no intention of entering this quilt into a competition and wanted a dark colored thread that would blend with the fabrics I used in the quilt. I knew quilting thread was slightly thicker than standard sewing thread and went to a decorator shop where they recommend using heavier thread for the heavier fabrics. I found a company which made a 40 weight thread that was perfect. It came in a wide variety of colors and I used it for years until it was purchased by another company and the manufacturing of the thread was outsourced to a foreign country. It was no longer the quality it had been.


I have learned a lot of my quilting lessons the hard way. When I was quilting one of my early quilts in 1976, I had chosen a poly-cotton quilting thread in white. It was a patriotic themed quilt designed for the bicentennial celebration. After about two weeks of quilting, I decided to take it out of the frame and check my stitches on the back. Much to my horror, where the quilting was done in straight lines along the grain of the backing fabric, there were small cuts that were made by the thread. The places where the quilting was done on the diagonal were ok. Polyester has a sharpness to it and it is also slightly elastic so if the thread is pulled too tightly it stretches and is even more apt to cut the fabric. I learned it is best to quilt with a thread fiber content that is compatible with the fabric used in the rest of the quilt.

I ended up taking out all the quilting I had done, replaced the backing and started over. Needless to say, that is the last time I used poly-cotton thread for either hand piecing or quilting and use only 100% cotton thread.


What color thread to use. For my early quilts, I used the same color thread throughout but as the years went by, I discovered that I liked using different colors depending on the color of the fabric I was quilting. It is not unusual for me to use three or four different colored threads in one quilt. I find I have certain “neutral” colored threads that blend with the fabrics that I often use such as light tan, grey/blue, dusty rosy red, grey/green, etc.

To wax or not to wax the thread. A lot of people ask this question. Waxing is where the thread is pulled over a piece of beeswax before sewing. I think it is a personal choice but I do not wax it. If a quilting thread is used it is already pre-waxed and my problem with waxing a non-quilting thread is I find that the waxing causes pieces of batting to be pulled out along with the thread, causing a “bearding” effect.

So much of the quilting process from beginning to end comes down to personal choices that we discover, as I have, along the way.

Posted on 3 Comments

Tropical Paradise

In my last blog I talked about taking a block design and making it with multiple fabrics for a scrappy effect. That blog has information that is helpful in understanding how I placed the fabric in the blocks used in this blog as well.


I was so excited about this painting my niece, Tanis Rovner, painted that the colors in the image inspired our Tropical Paradise bundle. Since this is such a popular color scheme, I decided to show how you could use all of the 14 fabrics we put in the bundles in a block that would normally use six or seven. This is just what I did in Desert Star and can be done for any quilt that could be made with only three fabrics.

Both of these blocks are free patterns that are in our Quilters’ Block Library on our web site. I chose the 12” pattern for 1904 Star and the 10” pattern for Attic Windows

Beginning with 1904 Star, notice that the light, medium and dark value placement is the same in each of the two blocks I created but most of the fabrics are different between the two. I was able to use all 14 bundle fabrics between the two blocks and then I alternated them in the quilt.


I created these blocks and quilt digitally but if I were actually sewing them, I would find it boring to repeat the exact same blocks throughout. For me the fun part is experimenting with lots of different fabrics that fall within the same color scheme. It is a good lesson in color and value placement to make each block different. If you like the colors in the Tropical Paradise bundle, begin with it and then go to your stash and find as many colors as you can within the same range.

TIP

If you can’t find as many fabrics as you want in a certain color, did you know that you can sort fabrics on our website by color? You can go to this link and then advanced search and select the color range you want and click on “GO”.


The second block I experimented with is Attic Windows. While this particular design can be made with just three fabrics—a light, medium and dark—it is perfect for a scrappy looking quilt. All fourteen fabrics in the Tropical Paradise Bundle have been used in these two blocks and then the blocks alternated in the quilt. Once again, as with 1904 Star, I would make each block with a variety of different fabrics to add to the scrappy look. I try to get a good balance of value and color within each block, so the colors just meld together, and the blocks disappear when they are assembled.

Please note that even though there are three values, each of the darks do not have to be very dark and the mediums do not all have to be the same value. Depending on the effect you want you can also use different lights for the lightest value in the quilt. As long as the medium piece is lighter than the dark next to it, it still reads as “medium”. Same with the mediums and lights. Sometimes one fabric might be used as a dark in one block, but a medium in another.


I always like to add a border to finish off a quilt. It is like adding a frame to a painting or piece art. Borders can be all one fabric, more than one fabric, border prints or pieced or appliqued. Some people prefer no border at all. In any case, the borders should carry out the colors from the inside. The colors of the border can drastically affect the color image the entire quilt portrays. You can see the no border options above and two different options below with these two quilt designs.


Posted on 9 Comments

Scrappy Quilts with Traditional Style Blocks

Growing up, we had a scrap bag. While I didn’t start quilting until I was an adult, as a child I was always sewing something. My sisters and I made a lot of our own clothes and there were always leftover pieces. I would look through the scraps searching for the right piece for various projects, including doll clothes, which I made by the dozens.

So naturally when I began my first quilt I automatically went to my scrap bag. I was living in India at the time and had fallen in love with the Indian hand-block printed fabrics. I had made clothes, bags and other items as gifts and for my own use and all the scraps went into the scrap bag. My first quilt, begun in 1972, was a Grandmother’s Flower Garden made with fabrics from that bag. Although I have to admit I made a few trips to the marketplace to purchase a few more fabrics for my quilt.

I “organized” the scraps so that I would use the same fabric in individual flowers, but then each flower would be put together differently. There were a few repeats.


From that point on, I have loved making quilts with lots of different fabrics. To me, the more fabrics the better.

I often am asked, “I understand how to use lots of different fabrics in quilts such as Baby Blocks or Thousand Pyramids, but how do you do it with block style quilts?”

First and foremost, you have to select a block design, shade it in grey scale, and determine where you want the lightest, mediums, darks and darkest tones.  I will illustrate with the block used in my quilt pattern Desert Star but the same process is used for all of my designs.

Here are two different ways you might choose to shade in the block, Desert Star.


Version A


Version B


I selected version A and then decided how many different value groups to have in the quilt. You can see here that I have six different values. Number 1 is  the lightest fabric. Fabrics 2 through 4 are light to dark with light in the center. Number 2 is not as light as the background fabric, number 1. Fabric 6 is a medium value and could be similar in value to fabric 3.


Once you have the block design and have decided on value placement within the block, the next step is to select a palette of colors. If you are at a loss for colors that look good together you might want to select one of our shaded bundles to start with. To get as many fabrics as possible, fill in with colors from your stash that fall within the same general color range as those in the bundle.

Next sort the fabrics into color groups. Here are the color groups I used when I made the quilt from the Sonoran Spring bundle:


Group 1, lightest fabrics for background


Group 2, star points light


Group 3, star points medium


Group 4, star points dark


Group 5, darkest fabrics for small triangles


Group 6, medium blues/blue grey for large corner triangles


Here are four different blocks made up of those color groups.  It is fun to see how many different blocks you can make using the same “formula.” Since this is a digital image, I have only used the four different blocks in the quilt shown here, but if I were making the actual quilt, I would follow the same formula. Keep in mind that you don’t have to be strict with the colors. For instance, depending on the other fabrics used, a fabric used as a dark star point in one block might be a medium point in another block. Just have fun and relax!


Stay tuned for another blog on how to incorporate border print fabrics in this design.

Posted on 49 Comments

Getting to Know Jinny Beyer Part II

Jinny Beyer blog

We received an email from Jan about a postcard she bought on eBay from a woman in Latvia.  Included was a photo of this card and she was wondering if we could tell her more about it. Shown here is that card. Yes, that is me from very long ago.


Many of you may know that, besides quilting, one of my other interests is amateur radio. When my father was a young boy he got his first ham radio license. To confirm a contact with another radio operator “hams” send out QSL cards. My father’s interest passed to me and I got my first license in 1957  (K6RQB) when I was in high school. I continued my ham radio activities until 1984.

I had quite some adventures along the way. Shortly after getting my license, Russia launched the first satellite to circle the earth. My father and I got up in the middle of the night so we could hear the first morse code signals the satellite emitted.

A few years after I was married, my husband, John, got a job in Nepal and right after that in India. My husband and I and our two young children went to live Nepal in 1968. I had been an active ham in the States and I got a license there.

Once in Nepal, I was one of only two hams in the country, and the only one who operated in both voice and morse code.  I was able to talk with my father almost every day. One of my frequent contacts was with King Hussein of Jordon who was also a ham. The American ambassador to Nepal was married to the ambassador of Viet Nam and the only way they could contact each other was by radio and Madam Ambassador would come to my house once a week to talk with her husband by way of a ham in Viet Nam.

Just like quilting, there is a bond among hams around the world. When my sister died and I made arrangements to fly home, obviously anyone listening knew my plans. At every single stop on the way home, a ham radio operator was there to greet me and make sure I had no trouble with my connections…New Delhi, Bangkok, Hong Kong, Honolulu and Los Angeles.

These days we are very lucky to be able to easily communicate with almost anyone, anywhere, but back then, this was quite a handy hobby to have.

To read more about this, my story appeared here on the web page for ham enthusiasts and their history here.