Whenever I have visited my grandchildren over the years and when they visit me, I always have a sewing project in the works. So, of course, they wanted a sewing project too. I have always let them select fabrics from my stash and create whatever they want. They loved laying out squares of fabric for a quilt, making fun projects for their friends and had all sorts of different ideas.
When school started this year, Polly decided one morning before school that she needed a bag for her iPad and whipped one up….no need for a pattern…Emmett decided that their new puppy needed a bean bag chair and figured out all on his own what to do.
When she was only 8, Polly asked for a sewing machine for Christmas. Now at ages 13 and 10 they are both adept at the machine. They disappear for a while and return with a finished project.
So, it was with a lot of memories that I enjoyed this exchange with my son-in-law, Rob, when he was organizing the basement.
Rob: As I organized the fabric bin in the basement, I can’t help but be astounded by the resourceful and efficient use of material.
Jinny: It’s so much easier to cut a chunk out of the middle.
Rob: That’s right. And when Grandma is supplying the fabric, who cares!!!
Jinny: Never ending supply. Maybe I’ve been too generous.
Rob: They remember every piece of that fabric you’ve given them. It’s kind of amazing. I also found out that Emmett has been leading a double life and is actually Spiderman…so many secrets in the fabric bin.
For the last few months, I have been sharing with you some of the quilts from my antique charm quilt collection. I have told you that one of the easiest ways to work with them is to create a unit and then use the same value placement in each block. But many quiltmakers experimented with other layouts of the pieces in ways to showcase each of the different fabrics. The quilt at the beginning of this newsletter is one example.
Quite a few of my charm quilts have radiating rings going from the center outwards. The right triangle in last month’s quilt can be used for these radiation ring designs as well. In this first one, it appears that the maker separated the pieces into lights and darks and then, depending on how many of the two groups there were, added the pieces one row at a time. The first ring is dark, then one ring of light, three of dark, one of light, two of dark and so on.
The maker of the second quilt has not only organized the pieces by light and dark but by color as well. Single rows of lights and darks have been alternated but the rings follow a color pattern as well. I like the way the red pieces in the center balance with the red ring further out. The same holds true with the dark blues.
An equilateral triangle has been used for the radiating rings in this next quilt. The rings are alternated lights and darks. The lightest fabrics are used in the center ring with the fabrics in each successive “light” ring being darker.
I love to look at the individual fabrics in a charm quilt and see what the maker had in mind. In this particular quilt, there are some very interesting fabrics that have been used. One of them is a “cheater” panel that was printed in the 1850’s. I don’t know if all of the cat and dog motifs in this quilt are from the same panel or more than one. But the maker felt because there were different motifs, it could be part of the “charm.” The other fabrics seem to indicate that this quilt was completed in the 1880s.
In this fourth quilt, the charm pieces are hexagon fabrics. Once again, the fabrics were sorted into lights and darks and then by color. The maker had very few green fabrics and I like the way they were arranged in the fourth ring from the center. Likewise, all the pink fabrics form one of the rings. Of particular interest to me is that there are a lot of striped fabrics in the quilt. A close examination shows that all of those fabrics have the stripes oriented in the same direction.
This series of posts on Charm Quilts has generated a lot of interest, comments and questions. We welcome those comments and love to hear what you are working on. For this post we will show more options for creating a charm quilt using squares.
For all my quilts, I like to create a “unit” that repeats over and over to make the entire quilt. Within that unit the shapes are arranged by value, then each unit follows the same “formula.” I make stacks of those units until there are enough for the quilt top.
So perhaps after gathering a lot of fabrics and cutting the shapes the next step is to organize the pieces by value. Your unit may have light and dark values or it might have light, medium and dark values.
This unit is made up of 25 squares. It is a Nancy Cabot design called Building Blocks and I found it in the Jan, 15, 1938 issue of the Chicago Tribune.
In the December 2021 newsletter we featured a Charm quilt made by Kay Sorensen. The 25 square unit is shown here. Four of those are pinwheeled and made into a larger unit and then those repeat for the quilt.
The Irish Chain design has many different variations. This one, called Double Irish Chain is a Laura Wheeler design that I found in the Aug. 6, 1933 issue of the Cincinnati Enquirer.
This is made up of units of 36 squares each. Then those, as in the quilt above are also pinwheeled to get the design.
One of my favorite scrap quilts is this one made entirely of small one inch squares. A portion of this quilt is shown at the beginning of this blog. While this is not a charm quilt with all the squares different, it does have a lot of different fabrics and it would be fun to accept the challenge of making all the squares all different for a true charm quilt. The quilt contains 49 of the units explained below and with 81 squares per unit, that makes 3,969 squares in the quilt. The full unit is shown here, but if I were making this, I would break it down into three separate 9-patch units.
Unit 1: Nine squares with three lights diagonally across the middle, four required for the larger unit.
Unit 2: Center 9-patch square with five lights and four mediums, one required for each unit.
Unit 3: Nine square with all medium and dark fabrics sewn together randomly
Then these units could be arranged for the larger square.
There are hundreds of ways squares can be organized to create an interesting design. Why not try your own?
See this months’ newsletter and the two previous blog posts for even more ideas for working with squares to create a charm quilt.
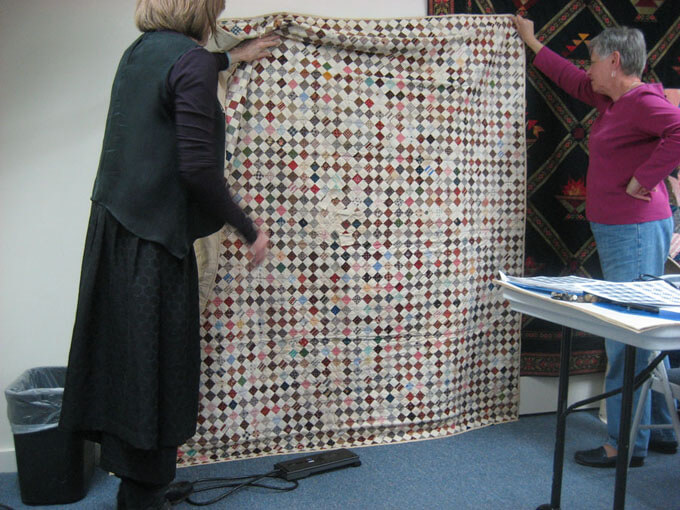
We have had a lot of interest in the last blog post about Charm Quilts. In general a charm quilt, made with one shape, is where each piece is cut from a different fabric. However in my research I have seen ones where all the different patches are alternated with a common fabric. I still call that a charm quilt.
Here was an interesting question from one of our readers, Nancy B.
“Jinny, must every square be different for it to be called “charm”? I ask because I have been making 5 “ squares of 5 rows of 5 one inch squares for several years and think of it as a “journal quilt”. I had read about the idea of using small scraps from each quilt as I made it and then assembling them into a larger quilt as a kind of way to keep a “journal” of the quilts I as I made them. But although I have 100s, some of the small squares repeat twice within a block to create a kind of symmetry around the center square or the opposite corners. I am sure to have over a 1000 fabrics used in total but some squares are duplicates. Shall I call it a Journal Quilt or is it a kind of Charm Quilt? Thanks for your opinion!”
Your quilt sounds like it is quite a journey. I love the idea and I love your name of “Journal Quilt”. But if a lot of pieces are duplicated I probably wouldn’t call it a charm quilt. That said, sometimes I have found that there is one piece in the quilt that has been duplicated, perhaps by design. I often wondered about that until I heard the following story. Someone who inherited a Charm Quilt that her grandmother made, told about having that quilt on her bed during a long childhood illness. She said, “I finally found the two patches alike, a game we used to play as children.”
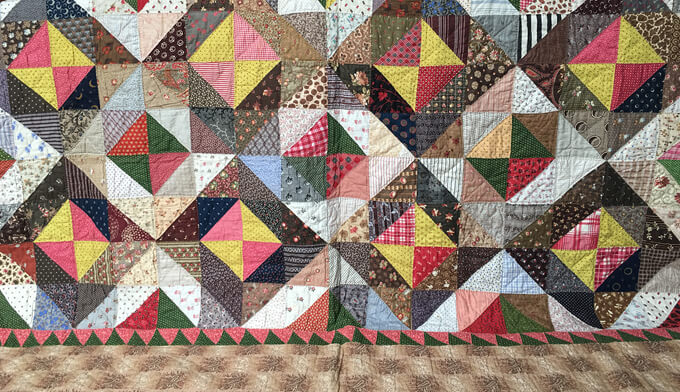
I have an antique charm quilt made with triangles (shown above). There are 16 block units that make up the quilt. When I first saw this I figured that it was not a charm quilt because I quickly realized that the triangles in the center of each unit were yellow and red, and most of them were cut from the same fabrics. Also the corner triangles of each of each block also had repeats. Two opposite corners were always green and the other two corners were either yellow or red. On closer examination, I discovered that those center and corner triangles were the only fabrics that were used multiple times. All the other pieces in the quilt (except for the border fabrics) were cut from different fabrics. There was a lot of planning that went into this quilt. I still call it a charm quilt because it was obviously the intention of the maker to create a quilt where the red and yellow centers of the blocks and the corner pieces were the “unifiers” of all of the different fabrics.
In each of the 16 blocks in the quilt, there are 32 triangles for a total of 512 triangles. However, 384 triangles are cut from different fabrics. I call this a charm quilt because it appears it was the intension of the maker to showcase all of those different fabrics. One of the block units is shown in the image below.
I must say, that in the charm quilt I made, I have a piece that was duplicated. It was not my intention to have those two pieces from the same fabric, but with so many different pieces it is hard to not repeat one. I only made the discovery after the quilt was finished. My niece and nephew who were five and seven at the time were staying with me for a few days and it was raining and they were bored. I spread out my charm quilt and told them to see if there were any pieces that were duplicated. It did not take them longer than a half an hour to find two pieces the same. I still call it a charm quilt even though inadvertently I used one fabric twice.
In my next blog post, which will come out in early December, I will show you some other ways simple squares can be put together to create interesting quilts. I will also give you some other shapes to download in case you want to create a quilt with a shape other than a square.
A charm quilt is a quilt that is usually made with a single shape and where each piece is cut from a different fabric. Squares, rectangles, hexagons, triangles and diamonds are probably the most common shapes used but others can be used as well. This is a fun project to work on in a quilting group, where you can trade fabrics with each other.
In this blog we start off with probably the easiest shape to work with, a square. The squares can be arranged in a variety of different configurations. But the best way to proceed is to have some type of unit. Then just sew units together and in the end the units can be arranged to balance out color.
The quilts shown here have basically the same layout. At first glance the first one, made with 3 ¾” finished size squares, appears to have those squares randomly sewn together. But a closer look shows four patch units with two squares in one block lighter than the other two. Then those squares are sewn together.
You can very clearly see the four patch units in Square Charm Quilt 2. Made with 2 ½” finished size squares, this quilt was very clearly made in four patch units with the lights quite a bit lighter than the darks.
Square Charm Quilt 3 is probably one of my favorite Charm Quilts. It was also constructed with four patch units. This time the printed fabrics were combined with a solid colored light fabric. The 1” finished size pieces are then sewn together. In the very center of the quilt is a patch with the following words, “This quilt contains 1,844 calico pieces, no two alike.” Several notes have been attached with basting stitches to some of the calico pieces. The notes contain the name of a person. My guess is that those particular fabrics came from the person whose name is on the notes.
Now you may be wondering why it is still considered a charm quilt even though all of those background fabrics are the same. You will often find a common background fabric in these quilts acting as a unifying factor. However, all of the other squares are different so it is still considered to be a charm quilt.
By now most of us have large stashes of fabric. Pull out those fabrics and stay tuned for more coming later this month on ways to make charm quilts with a variety of different settings. In the meantime, start collecting your squares or whatever shape you want to use.
In my last blog I talked about taking a block design and making it with multiple fabrics for a scrappy effect. That blog has information that is helpful in understanding how I placed the fabric in the blocks used in this blog as well.
I was so excited about this painting my niece, Tanis Rovner, painted that the colors in the image inspired our Tropical Paradise bundle. Since this is such a popular color scheme, I decided to show how you could use all of the 14 fabrics we put in the bundles in a block that would normally use six or seven. This is just what I did in Desert Star and can be done for any quilt that could be made with only three fabrics.
Both of these blocks are free patterns that are in our Quilters’ Block Library on our web site. I chose the 12” pattern for 1904 Star and the 10” pattern for Attic Windows
Beginning with 1904 Star, notice that the light, medium and dark value placement is the same in each of the two blocks I created but most of the fabrics are different between the two. I was able to use all 14 bundle fabrics between the two blocks and then I alternated them in the quilt.
I created these blocks and quilt digitally but if I were actually sewing them, I would find it boring to repeat the exact same blocks throughout. For me the fun part is experimenting with lots of different fabrics that fall within the same color scheme. It is a good lesson in color and value placement to make each block different. If you like the colors in the Tropical Paradise bundle, begin with it and then go to your stash and find as many colors as you can within the same range.
TIP
If you can’t find as many fabrics as you want in a certain color, did you know that you can sort fabrics on our website by color? You can go to this link and then advanced search and select the color range you want and click on “GO”.
The second block I experimented with is Attic Windows. While this particular design can be made with just three fabrics—a light, medium and dark—it is perfect for a scrappy looking quilt. All fourteen fabrics in the Tropical Paradise Bundle have been used in these two blocks and then the blocks alternated in the quilt. Once again, as with 1904 Star, I would make each block with a variety of different fabrics to add to the scrappy look. I try to get a good balance of value and color within each block, so the colors just meld together, and the blocks disappear when they are assembled.
Please note that even though there are three values, each of the darks do not have to be very dark and the mediums do not all have to be the same value. Depending on the effect you want you can also use different lights for the lightest value in the quilt. As long as the medium piece is lighter than the dark next to it, it still reads as “medium”. Same with the mediums and lights. Sometimes one fabric might be used as a dark in one block, but a medium in another.
I always like to add a border to finish off a quilt. It is like adding a frame to a painting or piece art. Borders can be all one fabric, more than one fabric, border prints or pieced or appliqued. Some people prefer no border at all. In any case, the borders should carry out the colors from the inside. The colors of the border can drastically affect the color image the entire quilt portrays. You can see the no border options above and two different options below with these two quilt designs.
I have been very lucky to have been quilting, teaching, writing books and designing fabrics for quilters for more than forty years. This past year, while there have been many things I haven’t been able to do, the Studio continues to operate, as an internet only business.
One positive we have found in the past several months is an influx of new quilters and others who have just “found” us. We welcome you all!
Since many of you are not familiar with me and my work, we have decided to add a feature to our newsletter called “Get to know Jinny Beyer” and each month I will answer a question you may have about me or my work.
One question I get asked all the time is “How did you get into fabric designing?” My answer has always been that I got in through the back door, not the front.
I have been sewing all my life and lived for several years in Malaysia, Nepal and India where I collected batiks and hand block printed fabrics. I began quilting while living in India and used scraps from all my sewing projects for quilts. Of course, I had to buy more specifically for quilts!
Jinny’s first quilt made with Indian hand block printed cottons, Grandmother’s Flower Garden
Upon returning to the States in the early 1970’s I was very disappointed in the fabrics that were available….mostly cutesy calico prints done in primary colors. After a few years of disappointment in what was available I decided that maybe I could tell fabric companies what kinds of fabrics quilters would like. I took it upon myself to put together a portfolio of prints and colors that I liked and how I would change them and made appointments with three different fabric companies. I took the train to New York full of optimism and came back home full of disappointment. At each place I got basically the same questions and the same treatment before they even looked at my portfolio. “Where did you go to design school?” “Were you a textile major in undergraduate school ?” “Have you studied color and color theory?” and on and on. I had never had that kind of an education. I had a master’s degree in special education. I felt like a little kid getting a pat on the top of my head as I left through the front door of each place.
I decided fabric designing was not in the cards for me.
Ray of Light
Then out of the blue one day in the late 70’s, I received a phone call from Nancy Puentes and Karey Bresenhan, the founders of the International Quilt Market. By this time my quilt, Ray of Light, had won the Good Housekeeping Magazine’s “Great American Quilt Contest” and my name was becoming known by quilters outside my own area.
Nancy and Karey were concerned that independent quilt stores were struggling to stay in business because they were competing with large fabric chain stores who could buy the fabric in bulk for better prices and offer them at a discount.
They had approached VIP, a New York basked fabric manufacturer, and asked if they would be willing to create a line of fabric that would not be sold to chain stores and that was exclusive to independent fabric retailers. They felt a quilter’s name should be associated with the collection and thought of me. Thus, their phone call.
I worked with VIP for three years, but in the early 1980’s they decided that quilting had reached its peak and they were going to get out before the interest waned and they dropped my line. That is when RJR contacted me and the rest is history. I have been working with them ever since.
My textile education has been learned through being immersed in the actual designing and creating for more than 40 years. I have yet to take a design or color course. As I like to say, “I got in through the back door, not the front.”
This is a little diversion from quilting but most quilters also love to cook.
Like so many of us during this pandemic, I have pretty much been hunkering down and staying home. One of the things I have been doing is baking sourdough bread. I have talked before about my 50 year old sourdough starter that I began while living in India. I have been keeping it alive all these years and recently have been doing more and more experimenting.
Last year a friend told me about Breadtopia.com and that web site has changed my sourdough bread baking forever.
When the pandemic hit, grocery shelves were devoid of bread, so for that reason I decided to make bread more often but then flour and yeast were hard to find. I didn’t need yeast because I had my sourdough starter but I needed flour. So, I decided to grind my own flour from a variety of wheat berries that Breadtopia sells. They also sell the home mill. The benefits of freshly milled flour are many but mainly there are no preservatives and it uses the whole wheat berry which is so much more nutritious
I now use solely whole grain freshly milled flour that I mill myself in my Mockmill 100 home mill that my son gave me for my birthday.
The web site has many recipes and videos showing every step of the way and they sell all of the best products used in breadmaking, including the clay bakers and wheat berries. One of my favorite recipes is this Whole Spelt Sourdough Bread, shown below. If you are interested in trying this bread for yourself, here is the link to the recipe along with the video tutorials.
In honor of National Homemade Bread day on November 17th, I took a photo of one of my loaves and with the Photoshop trick that I showed in this blog post, I extracted the colors. I have often said that a perfect color palette for a quilt also includes neutrals. These colors make the brighter colors stand out.
Red Fort and Snowbirds are good examples of quilts with lots of neutrals worked into the colors.
In your next quilt project see if you can include neutrals in your color palette.
If you are interested in trying this bread for yourself, here is the link to the recipe along with the video tutorials.
Last month we introduced Group 2 of the Rainbow Grand Bundle. Using my quilt pattern Night and Day as an illustration, I wrote a post about the proportions of colors, how they can change the appearance of a quilt design and how different a design looks with either a very light or a very dark background.
Night and Day with a light background.
This month, going a step further, I illustrate the same fabrics in the same strip configurations but with a medium color as the background. The second border had to be changed to one of the dark fabrics because there was not enough contrast between it and the background fabric used in the remaining borders.
As promised, the revised pattern using 28 fabrics rather than the original 14 is now ready for you to download for free.
Last month’s versions of Night and Day.
Which version of the designs shown this month and last is best? We all have different opinions so it is up to you to pick your favorite!
Periodically for the last few years I have put together “Grand Bundles” of fabrics, the colors of which are inspired by a beautiful photograph from nature. I am always on the lookout for a photo opportunity to use for these bundles. The best creator of colors for a palette is Mother Nature. I am always amazed when looking at a beautiful photo how different the colors are when you actually break down the photo. Nature forces us to add colors we never would’ve thought of adding. These make all the difference in the world.
A couple of weeks ago my daughter and her family were visiting and I put the children on a mission of looking for photo opportunities for the next grand bundle. One day my 10-year-old granddaughter came running into the house yelling,
“Grandma, Grandma, I have your photo. Get your camera and hurry.” I went running after her and there, seeming to come right out from my own backyard, was a beautiful rainbow. I thought that was a perfect palette for the next bundle. We tend to think of rainbow colors as bold and brilliant and I was surprised to see the soft shades emerge as I extracted the colors. I decided that batik prints would be perfect for this Grand Bundle.
Below the photo are the colors that were extracted using Photoshop (see this blog for how to get the colors in Photoshop) and here are the batiks that I chose to go with those colors.
There are 35 different fabrics in the Rainbow’s End Grand Bundle and we will be offering them to you as part of our web special program over the next five months. On the fourth week of each month we will offer seven of the Grand Bundle fabrics in “mini-bundles.” Collect them all and you will have a beautiful color palette to use for any of your favorite scrappy projects.
A color palette with this many fabrics makes a perfect scrap quilt such as the ones I showed you with previous Grand Bundles, Thousand Pyramids and Baby Blocks with the Irish Heather bundle and the simple squares with the Protea bundle. Here is a mock-up of what the Thousand Pyramids would look like with the Rainbow’s End bundle.
This color palette would be a perfect use for one of those patterns but I am also presenting a new one for you to experiment with. Stay tuned for next month when this popular quilt design, done in Rainbow’s End colors, is revealed and start collecting your first mini-bundle now.


 In your next quilt project see if you can include neutrals in your color palette.


