The first July 4th after we were married, John and I were invited to a pot luck barbecue with other graduate students. One of the dishes was an incredible pork and beans casserole. I asked for the recipe and was surprised at how easy it was to make. I have made several changes over the years and refined it and it has been part of our holiday barbecue ever since. This year since we are beginning to gather again, I want to share it with you.
Jinny’s Baked Beans recipe
2 Large cans Campbell’s pork and beans (28oz)
1 can Campbell’s cream of tomato soup
¼ cup brown sugar
1 lb. “hot” Jimmy Dean or Bob Evans pork sausage
2 crisp apples, peeled and cut into bite size chunks
Sauté the sausage and drain excess fat. Put all ingredients in a covered crock and stir together to mix.
Bake in a 250 degree oven for four hours. Remove lid during last half hour. Let sit for 30 minutes before serving.
This is a little diversion from quilting but most quilters also love to cook.
Like so many of us during this pandemic, I have pretty much been hunkering down and staying home. One of the things I have been doing is baking sourdough bread. I have talked before about my 50 year old sourdough starter that I began while living in India. I have been keeping it alive all these years and recently have been doing more and more experimenting.
Last year a friend told me about Breadtopia.com and that web site has changed my sourdough bread baking forever.
When the pandemic hit, grocery shelves were devoid of bread, so for that reason I decided to make bread more often but then flour and yeast were hard to find. I didn’t need yeast because I had my sourdough starter but I needed flour. So, I decided to grind my own flour from a variety of wheat berries that Breadtopia sells. They also sell the home mill. The benefits of freshly milled flour are many but mainly there are no preservatives and it uses the whole wheat berry which is so much more nutritious
I now use solely whole grain freshly milled flour that I mill myself in my Mockmill 100 home mill that my son gave me for my birthday.
The web site has many recipes and videos showing every step of the way and they sell all of the best products used in breadmaking, including the clay bakers and wheat berries. One of my favorite recipes is this Whole Spelt Sourdough Bread, shown below. If you are interested in trying this bread for yourself, here is the link to the recipe along with the video tutorials.
In honor of National Homemade Bread day on November 17th, I took a photo of one of my loaves and with the Photoshop trick that I showed in this blog post, I extracted the colors. I have often said that a perfect color palette for a quilt also includes neutrals. These colors make the brighter colors stand out.
Red Fort and Snowbirds are good examples of quilts with lots of neutrals worked into the colors.
In your next quilt project see if you can include neutrals in your color palette.
If you are interested in trying this bread for yourself, here is the link to the recipe along with the video tutorials.
Here it is almost the beginning of winter and fall seems like a blur. It seems I was on a treadmill and didn’t know when to get off. We had our anniversary sale, followed by some classes, then our 10-day shop hop, followed by a trip to Quilt Market in Houston and as soon as I got back from that turned around and went to visit my grandchildren (and their parents) on the other side of the country! Back home a few days ago, I am now in the throes of preparations for my most favorite holiday of the year, Thanksgiving.
No one worries about presents, cards, or the pressures of the December holidays……just good food, family and camaraderie. In the spirit of Thanksgiving, I want to share with you my recipe for stuffing. Years ago, I started with the basic bread, onion and celery stuffing and kept changing it little by little. Here is how I have been making it over the last several years.
Jinny’s Thanksgiving Stuffing
Makes 12 cups of stuffing
1 ½ cups chopped celery, including leaves
1 cup finely chopped onion
¾ cup Smart Balance
9 cups sprouted wheat soft bread cubes
1 lb. ground hot sausage (Jimmy Dean or Bob Evans)
3 cups peeled and coarsely chopped apples
1 ½ cups chopped pecans
1 ½ teaspoons salt
1 teaspoon ground sage or two tablespoons finely chopped fresh sage
In a large kettle, melt the Smart Balance and add the celery and onions. Stir and cook until celery is tender. In a separate skillet, cut the sausage into chunks and cook until crumbly. Add all ingredients to the onion/celery kettle and mix well. Taste for seasoning and add extra seasonings as necessary. Stuff the turkey cavities just before roasting. Put any leftovers in an oven proof dish, dot with more Smart Balance, cover and bake the last two hours of roasting the turkey.
I sat down this morning to write a blog about another of the projects I designed using my new mini-stripe fabric…the Route 7 Table Runner. The pattern is a free download and features five different colorways. It is interesting to note that all the strips, including the ones with the mini-stripe are all exactly the same width. The illusion because of the stripe just makes it seem more complex and narrower.
However, just as I sat down, the tree service people arrived. They were going to do some pruning of some large trees and the removal of a dead one.
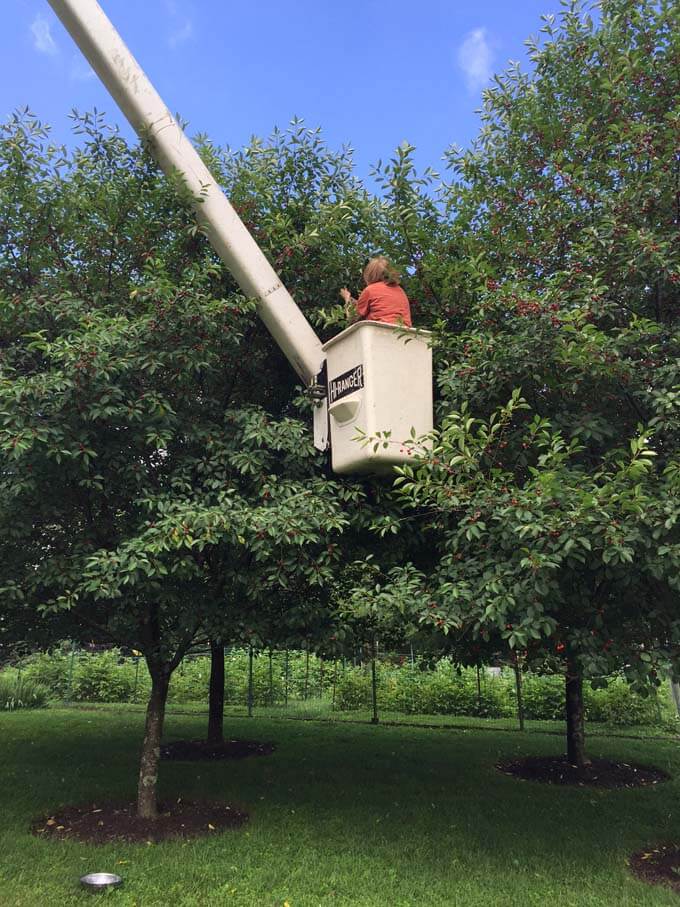
Now, I have to backtrack. I spent a couple of hours yesterday picking cherries. Last year a late frost zapped the blossoms on our trees and we had no cherries. This year we have literally thousands. Several years ago when we planted the four small cherry trees, it was so easy to pick the fruit. I had no idea, though, that they would grow so tall. Now, the only cherries I can reach are the ones on the lower branches.
So when I looked out the window this morning as tree service trucks were arriving I spied the bucket truck. I had to do some quick talking, but they finally agreed that they would let me “borrow” their bucket. It was actually kind of fun and I was able to get into the heart of the tree and get all those luscious cherries. I picked on only one side of one tree and had more than 35 pounds of cherries!
The only difficulty I had was getting in and out of the bucket.
I’ll be spending the rest of my day pitting, freezing, making jam and looking for other ways to use the cherries. One of my favorites is to make blueberry/cherry pie. The blueberries are so sweet that less sugar is used. The flavor of the cherries still comes through and you only have to pit half as many cherries!
I like to make several pie fillings and freeze them for use later. I line a pie pan with foil or Saran Wrap, put the pie filling directly into the lined pan and freeze it. Once it is frozen I wrap it up and slip it into a freezer bag. When I want to make a pie all I have to do is make a crust, insert the frozen pie filling into the crust and bake!
Blueberry Cherry Pie Recipe
Pastry for two-crust pie 9” pie
1 cup sugar
1/3 cup flour
2 cups fresh blueberries
2 cups fresh, pitted cherries
2 Tablespoons butter or margarine
Heat oven to 425° and prepare pastry.
Mix flour and sugar. In a separate bowl, mix berries and cherries together and sprinkle the flour/sugar mixture over fruit. Mix gently. Put fruit mixture in pastry lined pie pan, dot with butter and add the top crust. Cut slits in the top. Cover the edge of the crust with a 2 or 3 inch wide piece of aluminum foil.
Bake for 35 to 45 minutes. Remove the aluminum foil for the last 15 minutes of baking.
It is always exciting to go to the spring and fall quilt markets. This year was no exception. There are always old friends to meet and I even ran into Maria, one of my Ukrainian friends, who promised to give my best to all my friends in Ukraine.
I held a schoolhouse segment where I introduced my new mini stripe fabric, and the Amber Waves and Miyako fabric collections which will be arriving soon. When they do I will share some new projects to make with these collections.
Miyako and Arabic Tiles in the booth at RJR Fabrics
There were lots of great patterns that I brought home to make with some of my fabrics. Look for these in future web specials.
With Alex Anderson at Market.
With Edyta Sitar in the Laundry Basket Quilts booth.
Being gone this time of year is difficult. I came home to an abundance of strawberries in my garden. I plan to make one of my favorite pies for our Memorial Day family get together.
This is the time for fresh strawberries so give my recipe a try.
Fresh Strawberry Pie
Single layer 9-inch pie crust
6 cups freshly picked strawberries
1 cup sugar
3 Tbsp cornstarch
½ cup water
4 oz cream cheese at room temperature
Bake pie shell. Mash enough berries to measure 1 cup. Mix sugar and cornstarch in two-quart saucepan. Gradually stir in water and mashed strawberries. Bring to boil, stirring constantly and once it is boiling continue stirring and cook for one minute. Set aside to cool.
Carefully spread cream cheese in the bottom of the pie shell. Fill the shell with the remaining berries and pour the cooled sauce over the berries to completely cover them. Let set in the refrigerator at least three hours.
When raspberries and fresh peaches are ready try this same recipe with either one of those fruits, or try a combo with peaches and raspberries. For the combo, I make the cooked sauce from peaches only and then put both fresh peaches and raspberries in the pie shell and garnish with raspberries…….delicious!
We are starting to gear up for our Quilters’ Quest Shop Hop in November. All of the shops are taking sign-ups for their buses, so if you want to leave the driving to us, be sure to get your name on one of the lists. Check out the website at http://www.quiltersquest.org/
Do you want to see a little fun? Become acquainted with the shop owners who take part in the Quest and learn more about this fun-filled event by watching our video. We had great fun filming it and hope you have as much fun watching it!
Our staff had even more fun this past weekend. Elaine, one of our staffers, taught us all about boro-style needlework. “Boro” simply refers to a traditional Japanese method of mending, as well as the mended pieces themselves. The photos shown here are before and after shots of a piece that Elaine did for a bag she made.The boro stitch is essentially a running stitch but it creates wonderful texture.
Elaine’s Boro project – before and after
Carole and Judy enjoying the process of Boro-style needlework.
There was also classroom fun on Saturday when I taught a wonderful group of students hand quilting. I set up my large quilting frame and they had the experience of quilting on both a large frame and a hoop. I have been excited about the resurgence of hand quilting and love teaching the class.
Spring is so beautiful! It is hard to stay inside. This year the conditions are perfect for a nice crop of morel mushrooms. I made up a recipe for stuffing for them and it turned out so good that I want to share it with you. It would be good for any stuffed mushrooms.
Enjoy the recipe and get out and enjoy the spring!
Stuffed Morel Mushrooms
3/4 cup non-fat yogurt
½ lb. Bob Evans “hot” sausage browned and crumbled
½ cup grated parmesan cheese
½ cup grated Swiss cheese
2 spring onions, finely diced
2 cloves of garlic, finely crushed
Mix all ingredients together. Remove the stems of the mushrooms and carefully wash them, leaving them whole. Using a small spoon or narrow knife, push the filling into the mushrooms, filling them as full as possible. Bake for 10 minutes in a 375 degree oven.
I am traveling this week and wrote part of this blog before I left. I e-mailed my staff this morning to tell them that Nepal is just as wonderful today as it was 48 years ago when I first came.
I arrived early for the tour with two friends, Sandi and Carole, and we took a side trip to Pokhara. Sandi Goldman is a wonderful photographer and I will be sharing some of her pictures with you throughout the trip. The Himalayas are spectacular and our hotel has a magnificent view.
What could be better than sitting on top of the world, watching the sunrise…and keeping tabs on the Washington Nationals’ playoff game? Well, actually, it would have been better if the Nats had managed to win the game against the Dodgers.
Watching the sunrise over the Annapurna range in Pokhara, Nepal, and keeping track of the baseball playoffs.
If you are a follower of my blog you know that I often write about my garden. The only vegetables left for harvesting are peppers, a few cucumbers, some early fall lettuce, beets and my new favorite, jicama. I have eaten jicama in salads and love it, but never used it myself and didn’t even know what it looked like. But I saw some seeds in a catalog, ordered them and planted them. The package said they would mature in 150 days. I actually forgot about them. They are a root vegetable. When I finally dug one out a week or so ago I was shocked at the size. I never imagined they were so large. But what to do with it? Since I had had it in salads, I decided to make my own version of “Garden Salad”.
Photo by Gary Stevens
I cut one of the beets into slivers, added a sliced cucumber, a cut up red bell pepper, and sliced jicama. To my garden mix, I added a sliced Honey Crisp apple and some sliced hearts of palm. I mixed those all up and added two tablespoons of my favorite store-bought dressing, “Brianna’s Poppy Seed Dressing.” I tossed everything together and let it marinate for about an hour and at the last minute tossed in a little Romaine lettuce from the garden. It was so delicious. You should give it a try for a different salad.
Here is a link to a great article on jicama. Give jicama a try. You’ll love it.
Oops, I forgot the sweet potatoes. Maybe I should have found them sooner.
It is hard to believe it is almost the middle of August. I stay close to home this time of year to tend the garden, harvest the produce and catch up on projects.
Always during this time I am designing and making our quilt for the annual shop hop in our area, “Quilter’s Quest”. Each of the 10 shops designs a quilt based on fabric swatches that are collected during the Quest. Participants can pick up the free patterns at each of the stores.
2016 Quilters’ Quest Colors
I’m piecing our quilt by hand, although it is very conducive to machine piecing as all of the seams are straight lines with no set-in parts. I get most of my work done while watching the Washington Nationals baseball games. I finally finished all the blocks and am giving you a sneak preview here. I’ll have the top finished soon.
We had our shop hop meeting at the Studio this week and we are gearing up for this special event. In case you want to leave the driving to us, all shops still have space available on their buses including two buses from the Studio.
The Quest newsletter goes out the middle of each month from now through November. Be sure to sign up for it for the latest information and to get the free patterns for our Quest Mystery Quilt. Here are the first two blocks.
The patterns are only available through the newsletter. Shops have fabric kits for the fabrics they are using in their version of the mystery quilt. You can sign up for the Quest newsletter here.
The vegetable garden is consuming quite a bit of my time. I have never had so many cucumbers. I am constantly begging people to take some. I take them to the shop and when a customer comes in I tell them “Congratulations! You have just won a door prize.” I was not able to get to the garden last Friday and, by skipping just that one day, some of the cucumbers and zucchini got out of hand. I loaded up bags and took them as well as tomatoes and basil to the shop.
My favorite cucumber is a Japanese variety called Palace King. No matter how large they get, they still stay crispy and taste fantastic. The one in the photo is by far the biggest I have had. It measured 23”! The zucchini is 22”.
So, what do you do with all of that zucchini? One of my employees took one home and made delicious zucchini bread. I asked for the recipe. I hardly ever do a recipe exactly how it is given so I altered it a bit. I am on a self-imposed low cholesterol diet. I would rather regulate my cholesterol with diet instead of pills. So for this recipe I used 6 egg whites instead of 3 whole eggs. I used a half cup less sugar (and substituted brown sugar for the white). I thought cranberries would be a nice addition. I always like to sprinkle lemon/sugar zest on the top of the batter before baking so I included that as well. I served this at the Quest meeting the other day and everyone wanted the recipe, so I am giving it here for you as well.
Happy summer!
Jinny
No Cholesterol, Low Fat Zucchini Bread
Makes 2 loaves
Ingredients
Butter and flour for preparing baking pans
3 cups unbleached flour
1 teaspoon salt
1 teaspoon baking soda
1 teaspoon baking powder
4 teaspoons ground cinnamon
1 teaspoon nutmeg
3½ cups grated zucchini (you can use as little as 2 cups and as much as 4)
6 egg whites (After doing a price comparison on eggs vs. egg whites in a carton, I found that for $2.99 I could get a dozen eggs. For the same amount of egg whites I could get from that dozen it was more than twice the price. So I’d rather discard the yolks or save and microwave them to add to the dog food.)
½ cup applesauce
½ cup vegetable oil
1 ¾ cup brown sugar
4 teaspoons vanilla extract
1 ½ cups coarsely chopped pecans
1 ½ cups dried cranberries
3 Tablespoons Smart Balance (similar to margarine)
3 Tablespoons sugar
grated rind of 1 large lemon
Preheat oven to 350 degrees F. Generously butter and lightly flour two 8”x4” loaf pans.
1. In a medium bowl, sift together flour, salt, baking soda, baking powder, cinnamon and nutmeg. Stir gently to combine.
2. Shred zucchini, lightly packing it down as you measure it.
3. In the bowl of an electric mixer beat egg whites, applesauce, oil, sugar and vanilla extract. Mix very well. (You don’t want to over beat quick breads after the soda and baking powder are added, but since this is just the liquid part, and especially with the egg whites I think it helped to add air to the batter.)
4. Slowly add the dry ingredients (about ⅓ at a time) mixing as you go – then beat well to fully combine.
5. With a rubber scraper or wooden spoon, stir the shredded zucchini, cranberries and nuts into the batter and mix well.
6. Pour half of the batter into each prepared pan.
7. Melt the Smart Balance and brush on the top of each loaf.
8. Mix the sugar and grated lemon rind together and sprinkle on top of each loaf.
9. Bake for 45 to 60 minutes or until a toothpick inserted into the center of the loaf comes out clean. (The bake time will vary depending on how much shredded zucchini you add to the batter.)
We are in the middle of the Row by Row summer long shop hop. It has been such fun to meet the people from places far and wide who are participating. We had been anxiously anticipating a winner of the finished quilt made up of this years’ rows and were surprised that it was taking so long. But on Saturday we finally had a winner. Sheila Cooke of Burke, Virginia came in with her quilt that will hold lots of memories for her. She collected rows while she and her son drove to Colorado to visit her daughter and her quilt includes rows from Virginia, Maryland, Ohio and Colorado.
Speaking of shop hops, all of the shops involved in the Maryland/Virginia Quilters’ Quest shop hop have been busily preparing for our event in November. At our last meeting we traded fabric squares that participants will collect from each shop and now we are all designing and sewing our individual quilts that contain those fabrics. Everyone who comes to the Quest during our 10-day marathon will receive a free pattern for that shop’s quilt.
I have planned the design for our quilt and cut it out and have started sewing. On Sunday, I planned my day out. First I would go for a walk, read the paper and cut more pieces for our Quest quilt. Then while I watched the afternoon Washington Nationals baseball game I was going to sew some of the pieces together. After that, my plan was to make bread and butter pickles.
Well, the baseball game went into 18 innings. I kept sewing and sewing and sewing until almost all the pieces I cut were sewn. By the time the game was over it was time for dinner and there was no time to make pickles.
Early Monday morning I went to the garden to pick the cucumbers and was overwhelmed! The cucumbers liked the weekend rain we had and had virtually increased tenfold from what I had seen on Friday. Fortunately, my onions were ready to harvest so I could use those for the pickles as well.
I spent Monday making not just one batch of pickles but several, and I gave out cucumbers to friends and neighbors. By the way, the recipe I use is one that came from my mother-in-law and is an old Farm Journal recipe from the 1930’s. See below if you want to try. They are delicious!
Bread and Butter Pickles
4 quarts thinly sliced pickling cucumbers (if I don’t have enough I use the long English style)
2 quarts thinly sliced onions
1/2 cup canning salt (I use kosher when I can’t find the canning)
1 quart 5% acid strength vinegar
4 cups sugar
2 tbsp. mustard seeds
1 tbsp. celery seeds
1 tbsp. ground ginger
1 tsp. ground turmeric
1/2 tsp. white pepper
Layer cucumber slices and salt in large pottery crock or bowl. Cover with ice cubes and let stand in refrigerator for three hours. Drain well.
Combine vinegar, sugar, mustard seed, celery seed, ginger, turmeric and pepper in large kettle and bring to a boil. Boil for 10 minutes. Add cucumbers and onions and bring back to a full boil.
Pack into 8 sterilized pint jars, filling to within 1/4″ of the top. Wipe rims and add lids.
With the world in unsettling turmoil, families want to hunker down and be together. What better time than the Thanksgiving holiday where our thoughts go to family, cooking and the Thanksgiving day feast.
This year I want to share with you my recipe for turkey stuffing. It started out as a basic stuffing recipe, but each year I look at ways to improve it. This is what I will use to stuff my turkey this Thanksgiving.
Jinny’s Stuffing
This recipe makes approximately 8 cups stuffing. Allow about ¾ cup per pound of turkey. I usually roast a large turkey and will typically at least double this recipe.
1 ½ cups chopped celery
1 cup chopped onion
¾ cup butter (I use smart balance)
8 cups soft bread crumbs (cut into cubes)
3 cups chopped apple
2 cups chopped pecans
1 lb. package of Jimmy Dean Hot pork sausage
1 tsp. salt
¼ tsp. pepper
1 tsp. ground sage (if I still have some fresh from the garden I put in about 2 Tbls. Chopped fresh sage)
¾ tsp. dried thyme leaves
In a large pot, melt the butter or Smart Balance and sauté the onions and celery until tender. Remove from heat and stir in about ¼ of the bread cubes.
In a separate pan, sauté the sausage until brown and crumbly.
Mix the remaining bread cubes, sausage, pecans, apples and spices with the sautéed onion and celery. Stir to mix all together and stuff into turkey just prior to roasting.
My dressing gets a little more complicated because I have one vegetarian who can’t eat the sausage or the dressing if it is cooked in the turkey. I have another person who likes the sausage but can’t eat the nuts. So I mix every thing together except the sausage and nuts. Then I put a little dressing in a small oven proof dish and add a little sausage. This is for the non-nut eater. Next I add all the nuts to the remaining stuffing and make a small dish for the vegetarian. Finally, I add the sausage to the dressing and this goes into the turkey. Unfortunately, the vegetarian and non-nut eater don’t get their stuffing cooked in the turkey, but I dribble a little melted butter or Smart Balance over the stuffing in their dishes, cover with aluminum foil and bake in the oven with the turkey.
Happy Thanksgiving everyone!
Jinny
P.S. Don’t forget small business Saturday and support your local quilt store and any other small business you like in your neighborhood. If you want the businesses to be there when you need them, they need your support.


 In your next quilt project see if you can include neutrals in your color palette.


