Posted on 1 Comment

Irish Heather Grand Bundle

This week’s web special offers the last of the Irish Heather bundles. In August, I introduced the grand bundle with colors extracted from a photograph of the Irish hillside taken by Nancy Fallone. Once a month for five months we have offered nine of those fabrics as a web special. My blog of August 22nd also showed a Thousand Pyramids quilt made with all 45 of the fabrics.


I love scrappy quilts and as we wind up the Irish Heather grand bundle web specials, I want to share another of my favorite “scrappy” patterns made with a 60 degree diamond. There are more than 20 different names for this design including Baby Blocks, Tumbling Blocks and Diamond Cube. My pattern, ”Scrappy Blocks,” illustrates yet another name for this design.

Just as in Thousand Pyramids, this quilt is also made in block units. Within the unit try to get a balance of all the colors, the darks, lights and accents. Here is a sampling of possible blocks.


The pattern, Scrappy Blocks, has instructions for a crib-sized quilt, but to make the quilt larger just make more blocks until you have the width and length that you like. You would still use the same edge pieces that are used in the crib sized quilt, just more of them, depending on how many blocks you make for your quilt.

Borders Can Make a Difference

I love using border print fabrics to finish off a quilt. My border print fabrics all have both a narrow and a wide border as shown below. Sometimes there is just a solid color in the seam allowance areas and sometimes a pattern as seen in the second example.


Border print pictured is Miyako, 3208-004


Border print pictured is Bordering on Brillance, 1283-01


Typically, I add the narrow border, a “middle” border of a different fabric and then the wide border as I did in the two quilts shown above.

When making a smaller quilt, a border like the one shown above would be too wide and could overwhelm the interior design. Therefore it is necessary to try some other options. So in the next example, shown below, the Delhi border was used, but instead of using the narrow and wide stripe with a contrasting  fabric in between, I used the portion of the border shown below, which has the wide stripe, plus the seam allowance area and a portion of the edge of the narrower stripe.


Border print pictured is Delhi, 2448-03


I found this border still a little overwhelming for the small quilt, but that same border used on the larger quilt has better proportions.


I tried another variation of the Delhi border on the smaller quilt this time using the portion of the border shown here.


Here is yet another border on the Scrappy Blocks quilt.


Border print pictured is Casablanca, 2795-02


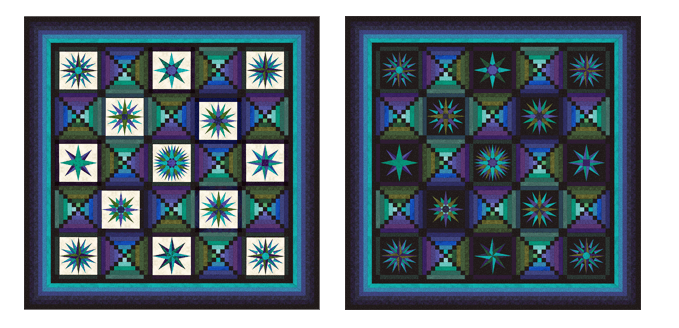
Compare all the quilts shown here and notice how the overall colors of the quilt look different depending on which color border is used.

If you have collected at least quarter yard sets of each of the Irish Heather bundles you would have plenty of fabrics to make the crib or double size quilts shown here. Three yards of border print is a safe amount for a double size quilt. Two and a quarter yards would be enough for the small one.

Posted on

Happy Thanksgiving!

Here it is almost the beginning of winter and fall seems like a blur. It seems I was on a treadmill and didn’t know when to get off. We had our anniversary sale, followed by some classes, then our 10-day shop hop, followed by a trip to Quilt Market in Houston and as soon as I got back from that turned around and went to visit my grandchildren (and their parents) on the other side of the country! Back home a few days ago, I am now in the throes of preparations for my most favorite holiday of the year, Thanksgiving.

No one worries about presents, cards, or the pressures of the December holidays……just good food, family and camaraderie. In the spirit of Thanksgiving, I want to share with you my recipe for stuffing. Years ago, I started with the basic bread, onion and celery stuffing and kept changing it little by little. Here is how I have been making it over the last several years.

Jinny’s Thanksgiving Stuffing

Makes 12 cups of stuffing

1 ½  cups chopped celery, including leaves

1 cup finely chopped onion

¾ cup Smart Balance

9 cups sprouted wheat soft bread cubes

1 lb.  ground hot sausage (Jimmy Dean or Bob Evans)

3 cups peeled and  coarsely chopped apples

1 ½ cups chopped pecans

1 ½  teaspoons salt

1 teaspoon ground sage or two tablespoons finely chopped fresh sage

1 teaspoon dried thyme or 2 tablespoons finely chopped fresh thyme

½ teaspoon ground pepper

In a large kettle, melt the Smart Balance and add the celery and onions.  Stir and cook until celery is tender. In a separate skillet, cut the sausage into chunks and cook until crumbly. Add all ingredients to the onion/celery kettle and mix well. Taste for seasoning and add extra seasonings as necessary. Stuff the turkey cavities just before roasting. Put any leftovers in an oven proof dish, dot with more Smart Balance, cover and bake the last two hours of roasting the turkey.

Happy Thanksgiving!

Posted on 2 Comments

Creating a Quilt with Irish Heather Fabrics

Last month I wrote a blog post on getting color inspiration from a photograph. I gathered fabrics that matched those colors and created the Irish Heather grand bundle of 45 different fabrics. I showed a quilt I created from those fabrics and arranged triangles in the traditional Thousand Pyramids style. So you have the bundle of 45 fabrics, you have the design, but the question arises about how to get a good distribution of the colors and that is what I want to talk about this week.


Any time I do a quilt like this, I like to work in “units.” It is easier to get a good distribution of the colors from a smaller unit than it is to try and visualize the entire quilt. Check out the first Irish Heather blog on how these colors came about.

For this quilt I had two units (A and B). The black and white sketch shows that in A the dark triangles are pointing upward and are across the bottom of the triangle. In B, the lights are across the bottom and pointing upward. To create the quilt, these two units are alternated with Unit B turned 180 degrees.  Half units fill in the sides.


Please note that in the above illustrations, all the darks are very dark and all the lights are very light. There is a lot more interest if some of the darks are lighter and some of the lights are darker. Any light triangle only has to be lighter than all the dark ones surrounding it and likewise any dark triangle only has to be darker than all the light ones surrounding it.  Compare the difference between the illustrations above and the one below.


The next task was to create those units in fabric. Each unit has 25 fabrics—15 darks and 10 lights for Unit A and 15 lights and 10 darks for Unit B.  In each one I tried to get a good balance of all the colors in the bundle as well as a good balance between values from light to dark.


When I put several of the units together I wasn’t sure I was getting the colors the way I wanted them. Comparing what I had to the photo I realized I needed more of the pinks and blues and less of some of the other colors.


So I made two additional units (C and D). For these units I had more of the blues and pinks. And then in the final quilt I alternated all four units.


While I made this quilt digitally with only the fabrics from the Irish Heather grand bundle, if I were doing it in actual fabric I would add many more fabrics from my stash that fall within the same range of colors. My philosophy is the more fabrics the better. In fact, this particular design was a favorite one to use when making a charm quilt…a type of quilt popular from the late 1800’s to early 1900…but that is a whole other story to pursue in future blog posts.

Why not give this quilt a try? Here are the two templates that I used in creating the quilt shown here. In addition to the templates, you will also find yardage requirements for the borders and some basic instructions. I hope you have fun with it. Look for additional Irish Heather bundles in upcoming Weekly Web Specials.

Posted on 2 Comments

My Quest Quilt: The Voyage Continues

Last month, I shared with you the beginning design process for our Quilters’ Quest Shop Hop quilt for this year. I designed the quilt in black and white and decided upon two different shaded units made from 60° diamonds.


The next step in the design process was to sort through the 2 ½’ strips that were collected from each shop.

First, I separated them by color. In the sorting process I discovered a few fabrics among the strips that had too much contrast, which would make the shading difficult. In all, I took out nine strips and set them aside for the small quilt I plan to make with leftover pieces.

The next step was to arrange them in a somewhat shaded order.


I would need five different fabrics for each diamond. In total, there are nine diamonds in each shaded unit, but for continuity I repeated the same fabric for the rows that have more than one diamond. (See black and white image above.) In other words, one fabric for the first row, two the same for the second, three the same for the third, then two of the same for the fourth and one for the fifth.

Next, using my 60° Perfect Cut Diamond Ruler and the companion 2½” diamond template, I cut each of the shaded strips into 12 diamonds. I saved the leftover bits from the strips for later to use for cutting edge pieces.

Once all the diamonds were cut, I arranged them in shaded groups of five or more fabrics. I like to have more than five so I can use this same grouping for different completed units. It makes the shading process easier. In other words, for this particular grouping here I have eight different fabrics that not only shade from light to dark, but more importantly they also shade “through” colors. A group of all blues or all yellows or all teals is not as interesting as ones that contain more colors.  You need to look for “blender” colors that help you get from one color to another.


For this particular group of diamonds, I can get four distinctly different shaded units. Fabrics 1-5 form one group, 2-6 form another, 3-7 another and finally 4-8 form the last.  Notice how different the first and last groups are.

This is the way you should proceed with all your diamond groupings. That way you have some lighter than others, some darker, some brighter and so forth.

A quilt like this is a great hand piecing project. In mid-May, I arranged several diamond units, some shaded lengthwise and some shaded sideways, and put them in my luggage and headed off to Quilt Market in Portland. I spent a few days after Market with my daughter and her family and by the time I had two five-hour plane trips and several hours of downtime while the kids were in school and their parents working, I was able to hand piece more than 40 of the 65 diamond units I needed for the quilt. Here are just a few of them.


Next time I will tell you about making larger units from the smaller ones already completed.


Posted on 3 Comments

Color Inspiration for Irish Heather

How many times have you seen a beautiful sunset or image in nature and wondered if you could capture those colors to use in a quilt?

Staffer Nancy Fallone took this photo on the final miles of a hiking trip in Ireland. We loved the colors so we decided to use it as inspiration for our next “Grand Bundle” that we will be offering in installments as a web special over the next few months. The photo captures the essence of the Irish hills when the heather is in full bloom.

There are a couple of ways you can pull the colors out of an image. The first is explained in this tip on our website.

This method is a little tedious and there is another that works well and is quite a bit faster. This method uses Photoshop. Here are the steps to take:

1.  Open the photo in Photoshop.

2.  Go to Image/Mode/Indexed color. A dialog box comes up asking you to select how many colors to show. I generally click anywhere from 100 to 250.  3.  Click OK

4.  Next go to Image/Mode/Color Table. A chart will come up with the 100 colors (or however many) you selected.

5.  Take a screen shot of the color table and save it.

I like to put the colors into shaded order and that takes some time. I make a box, select the color I want with the eyedropper tool and then fill the box with that color. You will find that many of the colors in the color table are very similar, so I eliminate some as I go.

Here is the photograph with the colors arranged in shaded order.


The next task, and the most fun, is to find fabrics in the Irish Heather colors.  This is how we created our new “Grand Bundle.” This Grand Bundle will be divided into five “mini” bundles. Once a month for the next five months we will be offering nine of these fabrics as a web special. Collect them all to build the entire Irish Heather Bundle Collection.


So, the next question is what to do with the fabrics once you have them. It should be no secret to anyone that I love using lots of different fabrics in my quilts and scrappy quilts are some of my favorites. I decided to use the fabrics from the Irish Heather Grand Bundle to create a Thousand Pyramids quilt.


For my blog at the end of August, I will explain how I arranged the triangles to get an even distribution of the fabrics throughout the quilt. I will also give you a template to download in the size I used for each triangle.

The first mini bundle will be offered as a web special on July 25th with subsequent bundles on sale the last Wednesday of each of the next four months.

Nature so often provides us with a beautiful palette of colors. I hope you enjoy these inspired by the beauty of the Irish countryside and don’t forget to watch for my Irish Heather blog next month.

Posted on 1 Comment

Not Too Soon to Plan Our Shop Hop Quilt Design

This is the time of year that I am working diligently on our quilt and pattern for our annual shop hop, Quilters’ Quest. The event is earlier this year (October 19-28), so I have to work even faster. As was the case last year, I want to share with you the planning and designing of the project.

The first step is to plan the color scheme. This year, since we selected the cruising theme “Anchors Aweigh,” we chose colors that are often reminiscent of warm tropical waters and sea glass found on the beach.

The next step was to decide on the size and amount of the fabric swatches each shop would have available for the customers to either purchase or receive for free, depending on the amount of their purchase. This year we selected six 2 ½” by the width of the fabric strips. Each shop selected six fabrics that would fit within the color palette shown here.

At our next meeting, everyone brought 10 sets of their chosen 2½” strips and we participated in a “swatch swap.” Each shop went away with 10 sets of fabrics, one set from each shop for a total of 60 different fabrics.


The lovely fabric swatches from all the shops.


Now is when the fun begins. Each shop must make a quilt using as many of the swatches as they can. They can also add other fabrics if they wish. One of the perks of the Quest is that you receive a free pattern for a shop’s quilt when visiting during the Quest. Participants can collect all the swatches and decide which of the Quest quilts they like the best. Most shops have “finishing kits” available to make their version of the quilt.

Since the cruise destination for our shop is Hawaii, I wanted to design a quilt that would fit in with that theme, and thought the beach at Waikiki with its high rise hotels seemingly emerging from the sea would be a perfect inspiration.


Photo courtesy of staffer Nancy Fallone.


Sixty-degree diamonds are one of my favorite shapes, and since they are very easy to cut from 2 ½” strips, a fragmented, shaded diamond design seemed a perfect choice for the Studio’s quilt. Value placement is so important in this type of design so I always do preliminary designing in black and white. I tried shading the diamonds in two ways, dark to light lengthwise and dark to light sideways. I played around with the configurations of these two block units until I arrived at a design I liked. It is actually a takeoff on one of my personal quilts from several years ago…I will share this with you when the finished quilt is revealed.


Stay tuned. Next week I will share with you how I sorted and shaded the fabrics.

Posted on 2 Comments

The Background Makes a Difference

With our new BOM, Kyoto Mystery, fresh in my mind and as I was working on a quilt design for a new fabric collection, I couldn’t help but think of the very first Block of the Month quilt that I created, Moon Glow, back in 2000. It has undoubtedly been the most popular quilt pattern and kit I have designed.

But I have a little story to tell you about Moon Glow. I’m telling you this because I was struggling with what to do for a background on the new quilt I am working on for the upcoming Denim collection.

Moon Glow has 12 different compass style blocks alternating with a log cabin style block. My friend, Carole, was helping me with the quilt so we could meet the deadline for RJR. I pieced the compass blocks by hand and Carole did the other blocks by machine.


Once all the blocks were complete we laid them out to see how they all looked. We were very disappointed. There was just too much contrast between the compass blocks and the alternate blocks. The design seemed more disjointed than cohesive. All that work and the design just wasn’t looking right. We finally determined that it was the light background behind the compass blocks and that they would look better with a black background. It was too much work to take out the light and replace it so we decided we needed to make a new set of blocks with a black background. We donated the discarded blocks to a fundraising venture and started again. Here you can see an image of the light background versus a dark background. Do you agree with our decision?


So, as I was working on Denim Star, I had the same problem. There was just too much contrast between the background and the rest of the design. I’ll have images to share with you as soon as RJR releases the collection and the quilt pattern is ready sometime in late summer or early fall. It will be a free download.

Posted on 3 Comments

Escape to an Island with a Bundle of Fabric!?!

Opening Photo Blog


In quilting today, we have thousands upon thousands of fabrics in an ever-changing palette available to us. When we enter a quilt shop, we find that beautiful array of color and fabric irresistible. As a result, it is rare that we meet a quilter who does not have a substantial stash. Have you noticed, though, for many of us, when we go to put fabrics together for a quilt we never seem to have quite what we need? There always seems to be something missing but we don’t know what.

It is no secret that I love color and I love shading fabrics but I realize that not everyone does. Putting together a quilt with many fabrics can seem overwhelming. Because we recognize this, we have always made available a large selection of shaded bundles. We would, though like to help you to understand how you can do this yourselves or maybe just watch the journey as we do it for you.

Grand Bundle Complete for Blog
The complete Island Escape bundle.


With that in mind, we have put together a collection of 40 shaded fabrics called the Island Escape bundle. (It was very hot and steamy while we were putting it together so I may truly have been looking for an Island Escape.)


A starting point for the Island Escape bundle, the Portable Palette.


To gather the colors I wanted for this Island Escape bundle, I first went to my “go to” color tool, my Portable Palette. I worked with various groups of colors, shading them together until I had a palette I liked.  I came up with a palette of 27 colors. Next I looked all around the shop trying to find fabrics of different textures and designs that would fit into the color range shown on the palette. Sometimes they were a little brighter, a little darker or had had a slightly different cast. As long as they blended in they would work! Ultimately, in the 40 piece bundle, I only used a small portion of the original Palette fabrics, but of course all of those could be added as well for even more variety in the bundle.

We will start presenting them to you, one mini-bundle of eight fabrics at a time, over the coming months in our Weekly Web Specials. Along the way, we will share tips and pattern ideas for how you can use them. Each mini-bundle shades from one color to the next so at the end you will have an entirely shaded collection of fabrics for fun, “scrappy” quilts.


Bundle No One for blog
Mini bundle #1


This month’s mini-bundle shades from pale seafoam through brilliant blue to deep violet and it will be on sale for the week’s special beginning July 26 and ending August 1.  The next bundle will be released later in August.

For more information on how to use my Portable Palette, visit the Tips and Lessons page on our website.

Posted on 5 Comments

The Birth of a Fabric

Usually a fabric is chosen to work with a specific pattern or design. In the case of this story, the reverse was true.

As you all know, I love to work with border print fabrics and other prints with mirror imaged motifs. When we select a border print to go around the outside of a quilt or to use inside the quilt, we often have a lot of leftovers. I’m always looking for ways to use these extra bits.

About a year ago I decided it would be fun to use up border print scraps in six pointed stars. I used our 2 ½” acrylic template. Six identical pieces were needed for each star. I sorted through scraps to come up with a color scheme and began making stars. It was such fun to see all the different ones and how the design changed depending on the placement of the mirror images. All the kaleidoscopic results kept tempting me to do more.


1. origina bp stars

Then the question came of how to sew the stars together. I thought of joining them with black diamonds.


2. stars on black

However the stars kept calling to me that they needed a narrow border around them. So I thought of cutting a narrow border from one of my border prints. This Corsica border seemed perfect with my colors.


3. corsica boder print bold

I only wanted to use this small bit that is outlined here.


5. diamond
In order to get the border next to each star, I had to break the diamond into four smaller pieces so the diamond could be completely surrounded by the border. Two are cut one direction and two are reversed.

I began sewing the stars together with the “border print” diamonds.

After I sewed several together, I realized that if the quilt was going to be a decent size I would need anywhere from 12 to 15 yards of the Corsica border to get enough of that small stripe for all the diamonds.

That is when I thought of designing a fabric that was only made up of the small border with black in between. It takes about a year from the idea to the fabric and finally this week the Mini-stripe fabric arrived. I did it in five colorways.


Mini Stripe Borders on Bolts

I remade the quilt with a larger (3”) diamond template and the new mini-stripe. I am thrilled with the outcome.

I’m calling the quilt Arabic Tiles, have created a pattern and also made an acrylic template set to make cutting the diamonds easier.


Arabic tiles glamour- lighter


arabic tiles quilt queen

You can use all your leftover bits and pieces of border print, or we have also made a kit in the colorway shown here.  There are two sizes……wall and double

Margot, one of our customers, has already started using her scraps to make stars. She said it is addictive and so much fun to see how different each one can be.


10. margo with her stars

For the Arabic Tile quilt, you only need two yards of the fabric for the diamonds joining the stars instead of 15! I’m dreaming up all kinds of other ways to use the fabric as well. Stay tuned for more projects and let us know if you find innovative ways to use it as well.

Posted on 4 Comments

Never a Dull Moment

This is one of my favorite times of the year. The Virginia bluebells are in full bloom along the Potomac River in Great Falls National Park. Our native redbuds are announcing spring with their brilliant violet flowers, the onions, potatoes and early vegetables are planted in my garden and we are already enjoying the early spring greens and winter onions in salads.


Virginia Bluebells
Virginia Bluebells


Redbuds
Redbuds


Early Veggies
Early Veggies


That is not to say we don’t get surprises. Last week, I was teaching my Diamonds class at my shop. We had just begun the class when all of a sudden our shop phone rang, I received one of those alerts on my cell phone and I received an urgent text message from my son-in-law in Oregon (who works on mapping at the U. S. Geological Survey)…all of these simultaneous alerts (including alerts on phones of the students) were telling us that there was a tornado warning for Great Falls and we were to seek immediate shelter.


Teaching One


Class Work Three


Class Work Two

Now we were all on the second floor of our building and could see the suddenly ominous black sky. We all hastily retreated to the basement of our building which houses the utilities. Space was crowded and we got to know each other up close and personal. It was amazing how, not only calm, but jovial the students and staff were in this cramped and dusty place.


Basement Hiding Four


Basement Hiding One


Basement Hiding Two
It was definitely cozy!


Basement Hiding Three


Student Karen made me laugh at the essentials she brought with her--her fabric and sewing supplies.
Student Karen made me laugh at the essentials she brought with her–her fabric and sewing supplies.


Within 15 minutes the danger was over and we resumed the class. The two Canadian ladies, two from West Virginia, and one from California who had traveled here for the class along with the locals were quite excited to let all their friends know about our little adventure. We did learn that several small tornados did touch down not too far from us.


Bonnie and Joan from Canada.


Susan from California.


Malloy from Maryland
Mally from Maryland

Working with diamonds is one of my favorite classes to teach and they all made great progress. It is a wonderful opportunity to work on both design and color. Here are some photos of them hard at work and some of the results.


Class Work One


Student Work One
Susan has come from California several times to take classes from Jinny and this is at least the second (or third) time she’s taken Diamonds. The quilt is the result of what she learn from Jinny before. Isn’t it beautiful?