Posted on 12 Comments

Charm Quilts

So, what is a Charm Quilt?

A charm quilt is a quilt that is usually made with a single shape and where each piece is cut from a different fabric. Squares, rectangles, hexagons, triangles and diamonds are probably the most common shapes used but others can be used as well. This is a fun project to work on in a quilting group, where you can trade fabrics with each other.

In this blog we start off with probably the easiest shape to work with, a square. The squares can be arranged in a variety of different configurations. But the best way to proceed is to have some type of unit. Then just sew units together and in the end the units can be arranged to balance out color.

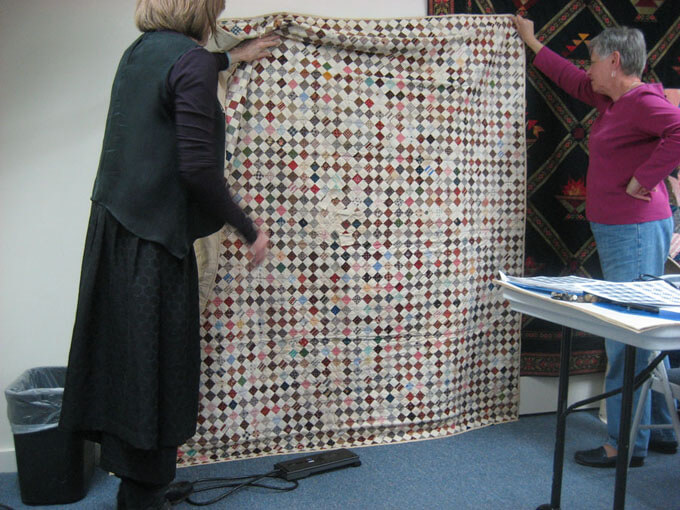
The quilts shown here have basically the same layout. At first glance the first one, made with 3 ¾” finished size squares, appears to have those squares randomly sewn together. But a closer look shows four patch units with two squares in one block lighter than the other two. Then those squares are sewn together.


You can very clearly see the four patch units in Square Charm Quilt 2. Made with 2 ½” finished size squares, this quilt was very clearly made in four patch units with the lights quite a bit lighter than the darks.

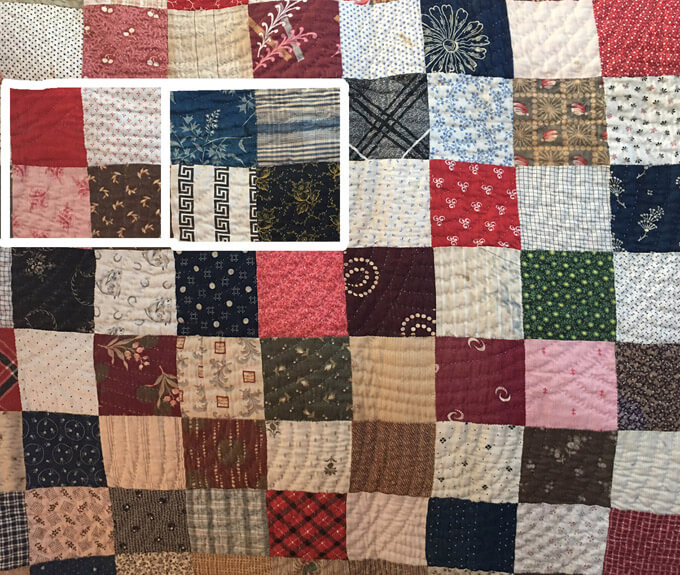


Square Charm Quilt 3 is probably one of my favorite Charm Quilts. It was also constructed with four patch units. This time the printed fabrics were combined with a solid colored light fabric. The 1” finished size pieces are then sewn together. In the very center of the quilt is a patch with the following words, “This quilt contains 1,844 calico pieces, no two alike.” Several notes have been attached with basting stitches to some of the calico pieces. The notes contain the name of a person. My guess is that those particular fabrics came from the person whose name is on the notes.


Now you may be wondering why it is still considered a charm quilt even though all of those background fabrics are the same. You will often find a common background fabric in these quilts acting as a unifying factor. However, all of the other squares are different so it is still considered to be a charm quilt.

By now most of us have large stashes of fabric. Pull out those fabrics and stay tuned for more coming later this month on ways to make charm quilts with a variety of different settings. In the meantime, start collecting your squares or whatever shape you want to use.

Posted on 3 Comments

Tropical Paradise

In my last blog I talked about taking a block design and making it with multiple fabrics for a scrappy effect. That blog has information that is helpful in understanding how I placed the fabric in the blocks used in this blog as well.


I was so excited about this painting my niece, Tanis Rovner, painted that the colors in the image inspired our Tropical Paradise bundle. Since this is such a popular color scheme, I decided to show how you could use all of the 14 fabrics we put in the bundles in a block that would normally use six or seven. This is just what I did in Desert Star and can be done for any quilt that could be made with only three fabrics.

Both of these blocks are free patterns that are in our Quilters’ Block Library on our web site. I chose the 12” pattern for 1904 Star and the 10” pattern for Attic Windows

Beginning with 1904 Star, notice that the light, medium and dark value placement is the same in each of the two blocks I created but most of the fabrics are different between the two. I was able to use all 14 bundle fabrics between the two blocks and then I alternated them in the quilt.


I created these blocks and quilt digitally but if I were actually sewing them, I would find it boring to repeat the exact same blocks throughout. For me the fun part is experimenting with lots of different fabrics that fall within the same color scheme. It is a good lesson in color and value placement to make each block different. If you like the colors in the Tropical Paradise bundle, begin with it and then go to your stash and find as many colors as you can within the same range.

TIP

If you can’t find as many fabrics as you want in a certain color, did you know that you can sort fabrics on our website by color? You can go to this link and then advanced search and select the color range you want and click on “GO”.


The second block I experimented with is Attic Windows. While this particular design can be made with just three fabrics—a light, medium and dark—it is perfect for a scrappy looking quilt. All fourteen fabrics in the Tropical Paradise Bundle have been used in these two blocks and then the blocks alternated in the quilt. Once again, as with 1904 Star, I would make each block with a variety of different fabrics to add to the scrappy look. I try to get a good balance of value and color within each block, so the colors just meld together, and the blocks disappear when they are assembled.

Please note that even though there are three values, each of the darks do not have to be very dark and the mediums do not all have to be the same value. Depending on the effect you want you can also use different lights for the lightest value in the quilt. As long as the medium piece is lighter than the dark next to it, it still reads as “medium”. Same with the mediums and lights. Sometimes one fabric might be used as a dark in one block, but a medium in another.


I always like to add a border to finish off a quilt. It is like adding a frame to a painting or piece art. Borders can be all one fabric, more than one fabric, border prints or pieced or appliqued. Some people prefer no border at all. In any case, the borders should carry out the colors from the inside. The colors of the border can drastically affect the color image the entire quilt portrays. You can see the no border options above and two different options below with these two quilt designs.


Posted on 2 Comments

Last Rainbows’ End Bundle

For some quilters, choosing fabrics for a scrap quilt can be a daunting and confusing process.  Any of our grand bundles work very well for scrap-type projects and designs. The web special this week features the last mini-bundle of the Rainbows’ End Grand Bundle. If you have collected all five of the mini-bundles you have a great collection of fabrics for any scrap project.

A very good example of this would be the quilt I designed for this year’s Quilters’ Quest shop hop. For that quilt, we chose colors of fabric bound books and I called our quilt “Open Book.” (See my October 1 blog.) But the design will look equally good in other color schemes, including the Rainbows’ End  Grand Bundle.

We are in the process of reworking the Open Book pattern for a scrap quilt project, so even if you did not attend the Quest you will still be able to make the quilt. The pattern will be available within the next couple of weeks. Meanwhile, make sure you have all five of the bundles because these colors and fabrics would be perfect made into Open Book.

Posted on 6 Comments

Our New Grand Bundle – Rainbow’s End

Periodically for the last few years I have put together “Grand Bundles” of fabrics,  the colors of which are inspired by a beautiful photograph from nature. I am always on the lookout for a photo opportunity to use for these bundles. The best creator of colors for a palette is Mother Nature. I am always amazed when looking at a beautiful photo how different the colors are when you actually break down the photo. Nature forces us to add colors we never would’ve thought of adding. These make all the difference in the world.

A couple of weeks ago my daughter and her family were visiting and I put the children on a mission of looking for photo opportunities for the next grand bundle. One day my 10-year-old granddaughter came running into the house yelling,

“Grandma, Grandma, I have your photo.  Get your camera and hurry.” I went running after her and there, seeming to come right out from my own backyard, was a beautiful rainbow. I thought that was a perfect palette for the next bundle. We tend to think of rainbow colors as bold and brilliant and I was surprised to see the soft shades emerge as I extracted the colors.  I decided that batik prints would be perfect for this Grand Bundle.

Below the photo are the colors that were extracted using Photoshop (see this blog for how to get the colors in Photoshop) and here are the batiks that I chose to go with those colors.


There are 35 different fabrics in the Rainbow’s End Grand Bundle and we will be offering them to you as part of our web special program over the next five months. On the fourth week of each month we will offer seven of the Grand Bundle fabrics in “mini-bundles.” Collect them all and you will have a beautiful color palette to use for any of your favorite scrappy projects.


A color palette with this many fabrics makes a perfect scrap quilt such as the ones I showed you with previous Grand Bundles, Thousand Pyramids and Baby Blocks with the Irish Heather bundle and the simple squares with the Protea bundle. Here is a mock-up of what the Thousand Pyramids would look like with the Rainbow’s End bundle.

This color palette would be a perfect use for one of those patterns but I am also presenting a new one for you to experiment with.  Stay tuned for next month when this popular quilt design, done in Rainbow’s End colors, is revealed and start collecting your first mini-bundle now.

Posted on 18 Comments

Protea – A Bundle With So Many Possibilities

Last month, we introduced our latest grand bundle, Protea, named after an amazing flower found in South Africa. As I often do, the colors for this bundle we’re pulled from a photograph the Studio’s manager, Rebecca, took while on a trip there in 2017. If you are interested in this process of capturing colors from a photo, I wrote about it in a blog when we introduced the Irish Heather bundle.  There are 40 fabrics in the Protea bundle and we have broken it up into five smaller bundles of eight fabrics each. Once a month we offer one of the smaller bundles as our web special.


Whenever we introduce a new bundle, we always discuss possible projects to give you all an idea of how you can use the fabrics. Both the Thousand Pyramid and Tumbling Blocks quilt were shown in the Irish Heather blogs and would be perfect for this bundle as well. Another suggestion is a quilt, Potomac Charm, designed in 2013 for the Quilters’ Quest shop hop.

Potomac Charm used 99 five-inch charm squares so, in order to have enough to play with, we cut two squares from each of the 40 Protea fabrics and staffer Nancy and I started arranging them on the design wall. We decided on a setting of 54 “blocks,” set six across and nine down. Swatches were added, moved around and taken down. Just when we thought we had it set we would change it again. Then we added border prints down the sides to audition them. What do you think?


After the positioning of the squares was set I created a digital image and played around with border options. Since the quilt was so small, I chose to start with the narrow border from the Casablanca fabric. The best outer border was just a wider black piece. To determine the best width for that last border I got out my trusty Golden Gauge Calipers. This gave me the perfect size for that last border. If you are not familiar with the Golden Ratio, check out my blog on this topic from a few years ago.


I tried another version using the border print from Miyako.


The finished quilts are approximately 59” x 67”. We always have people wanting to make our quilts larger. So I decided to play around with the digital image. I removed the top and bottom rows of squares then made two exactly alike and two that were the mirror image.


Since the quilt is larger, I used the wider stripe from the fabric and then used the calipers to determine how wide the black should be. Here is the quilt with the two different borders.


No longer a charm quilt (charm quilts do not duplicate fabrics), we decided to name this Protea Squares. The small quilt measures 34” x 50.5” without the borders and 59” x 67” with the borders. The large quilt is 67” x 78” without the border and 84” x 95” with the borders.

The finished width of our smaller quilt outer border is 3 7/8” (cut 4 3/8”). The finished width of the larger quilt outer border is 8½” (cut width 9”).

We are giving the Potomac Charms pattern here as a free download. You can use that as a guideline for creating your own 5” square quilt. We encourage you to play with fabric placement and settings, adding more squares or less, (depending on the size you want) or even adding fabrics from your stash.  Once you get started, I’m sure you will have as much fun as we did. 

Posted on 2 Comments

Creating a Quilt with Irish Heather Fabrics

Last month I wrote a blog post on getting color inspiration from a photograph. I gathered fabrics that matched those colors and created the Irish Heather grand bundle of 45 different fabrics. I showed a quilt I created from those fabrics and arranged triangles in the traditional Thousand Pyramids style. So you have the bundle of 45 fabrics, you have the design, but the question arises about how to get a good distribution of the colors and that is what I want to talk about this week.


Any time I do a quilt like this, I like to work in “units.” It is easier to get a good distribution of the colors from a smaller unit than it is to try and visualize the entire quilt. Check out the first Irish Heather blog on how these colors came about.

For this quilt I had two units (A and B). The black and white sketch shows that in A the dark triangles are pointing upward and are across the bottom of the triangle. In B, the lights are across the bottom and pointing upward. To create the quilt, these two units are alternated with Unit B turned 180 degrees.  Half units fill in the sides.


Please note that in the above illustrations, all the darks are very dark and all the lights are very light. There is a lot more interest if some of the darks are lighter and some of the lights are darker. Any light triangle only has to be lighter than all the dark ones surrounding it and likewise any dark triangle only has to be darker than all the light ones surrounding it.  Compare the difference between the illustrations above and the one below.


The next task was to create those units in fabric. Each unit has 25 fabrics—15 darks and 10 lights for Unit A and 15 lights and 10 darks for Unit B.  In each one I tried to get a good balance of all the colors in the bundle as well as a good balance between values from light to dark.


When I put several of the units together I wasn’t sure I was getting the colors the way I wanted them. Comparing what I had to the photo I realized I needed more of the pinks and blues and less of some of the other colors.


So I made two additional units (C and D). For these units I had more of the blues and pinks. And then in the final quilt I alternated all four units.


While I made this quilt digitally with only the fabrics from the Irish Heather grand bundle, if I were doing it in actual fabric I would add many more fabrics from my stash that fall within the same range of colors. My philosophy is the more fabrics the better. In fact, this particular design was a favorite one to use when making a charm quilt…a type of quilt popular from the late 1800’s to early 1900…but that is a whole other story to pursue in future blog posts.

Why not give this quilt a try? Here are the two templates that I used in creating the quilt shown here. In addition to the templates, you will also find yardage requirements for the borders and some basic instructions. I hope you have fun with it. Look for additional Irish Heather bundles in upcoming Weekly Web Specials.

Posted on 3 Comments

Escape to an Island with a Bundle of Fabric!?!

Opening Photo Blog


In quilting today, we have thousands upon thousands of fabrics in an ever-changing palette available to us. When we enter a quilt shop, we find that beautiful array of color and fabric irresistible. As a result, it is rare that we meet a quilter who does not have a substantial stash. Have you noticed, though, for many of us, when we go to put fabrics together for a quilt we never seem to have quite what we need? There always seems to be something missing but we don’t know what.

It is no secret that I love color and I love shading fabrics but I realize that not everyone does. Putting together a quilt with many fabrics can seem overwhelming. Because we recognize this, we have always made available a large selection of shaded bundles. We would, though like to help you to understand how you can do this yourselves or maybe just watch the journey as we do it for you.

Grand Bundle Complete for Blog
The complete Island Escape bundle.


With that in mind, we have put together a collection of 40 shaded fabrics called the Island Escape bundle. (It was very hot and steamy while we were putting it together so I may truly have been looking for an Island Escape.)


A starting point for the Island Escape bundle, the Portable Palette.


To gather the colors I wanted for this Island Escape bundle, I first went to my “go to” color tool, my Portable Palette. I worked with various groups of colors, shading them together until I had a palette I liked.  I came up with a palette of 27 colors. Next I looked all around the shop trying to find fabrics of different textures and designs that would fit into the color range shown on the palette. Sometimes they were a little brighter, a little darker or had had a slightly different cast. As long as they blended in they would work! Ultimately, in the 40 piece bundle, I only used a small portion of the original Palette fabrics, but of course all of those could be added as well for even more variety in the bundle.

We will start presenting them to you, one mini-bundle of eight fabrics at a time, over the coming months in our Weekly Web Specials. Along the way, we will share tips and pattern ideas for how you can use them. Each mini-bundle shades from one color to the next so at the end you will have an entirely shaded collection of fabrics for fun, “scrappy” quilts.


Bundle No One for blog
Mini bundle #1


This month’s mini-bundle shades from pale seafoam through brilliant blue to deep violet and it will be on sale for the week’s special beginning July 26 and ending August 1.  The next bundle will be released later in August.

For more information on how to use my Portable Palette, visit the Tips and Lessons page on our website.

Posted on 2 Comments

Planting a Fabric Tree

It’s been bustling around the Studio these days. One of our very popular items this season has been our holiday tree bundles.This year during our annual shop hop Charlie from Connecticut came down to participate in the Quest and went on one of our buses. Charlie brought a gift from his local quilt shop, That’s Sew Debbie, in Groton, Connecticut. It was a cute fat quarter bundle with four fabrics folded into a tree.

Of course, I had to figure out how the pieces were folded. I dissected the bundle and came up with a system that works for me.


When you make the first fold, be sure to fold long side to long side. I wanted to hide all the raw edges, get a perfect 60 degree triangle when done and have it compact enough to stay together. My Perfect Cut 60 Degree Ruler worked great to get the angle.


The first words out of everyone’s mouth when they see one of the trees is “It’s so cute!”


We think they make adorable Christmas gifts and wanted to share the process of assembling them with you. Watch the video below and start folding some yourself!

Enjoy!

Posted on 4 Comments

Try Your Hand at Color Shading

Customers walking into the Studio are greeted by hundreds of fabrics in an array of colors. In nearly every bit of wall space, we have quilts with dozens of fabrics.  Fat quarter bundles designed to shade from one color to another are in baskets and boxes. But what if you want to choose your own fabrics? It is easy to become overwhelmed when it comes to selecting colors and fabrics for a project. Many quilters don’t know where to start. It really isn’t that hard and can be a lot of fun once you get started.

On our website, we have three large fabric bundles, Emerald Isle, Indian Marketplace, and Shades of the Tropics, which are examples of my color theory. Each contains 39 fabrics divided into three color groups. While they look great on their own, they are more effective together. We recently decided to add another fat quarter collection, and I’ll use this to show you how easy color shading can be.

BundlesOur Moon Glow quilt has been popular for years and customers love the colors, so I decided to create a Moon Glow fat quarter bundle. I first chose a range of colors and made sure that I had several shades of those colors. There should be no gaps from one to the next, the more fabric the better.

Image 1Next, I added some deep darks, fabrics darker than the others to make my original colors pop.

IMG_5199-2I then added a couple of accent fabrics, both a little brighter than the other colors.

Image4It’s starting to look nice, isn’t it? Now I’m going to add neutrals. Neutrals cover a wide range but I think of them simply as grayed-down or muddied colors. Often quilters skip these because they say they don’t really like these colors. These neutrals, though, make the other fabrics shine. Can you see what a difference they make?

Image3Finally, I took my Portable Palette and went shopping through my stash just as you can do at home. (Of course, my stash happens to be the Studio!) Fill in anything that’s missing with a trip to your local quilt shop. Here’s how these colors work in Moon Glow and in our new fat quarter bundle.

Moonglow collageCheck out my video on our website for more details on color shading. I had so much fun putting together this fat quarter collection that I’m already planning another which will be available soon. Are you ready to give it a try?